The Developer’s Guide to Ethereum L2 Networks
The ultimate guide to Ethereum L2s and how they contribute to scalability for developers.


The ultimate guide to Ethereum L2s and how they contribute to scalability for developers.
As Ethereum grows in popularity so to have the costs and resources required to build decentralized applications on the network. The Developer's Guide to Ethereum L2 Networks provides a complete overview of the most popular solutions like Polygon, Linea, Optimism, and more, and how they work to scale smart contacts and applications. You'll also learn the steps to connect to and deploy dapps on these L2s using Infura and Truffle and MetaMask. Let's go!
What are L2 networks?
L2s are protocols and chains that operate on top of a main parent chain (Ethereum). L2s aim to make Ethereum cheaper and faster.
How? By offloading data and intensive computations from the main chain while maintaining the sanctity and verifiability of the transactions. Ethereum can only handle about 15 transactions per second. As the popularity of Ethereum rises, the network struggles to keep up with the traffic.
L2s move transactions off to a separate chain where transactions are cheaper and faster. In most cases, it then processes those transactions, rolls them up, and commits them to Ethereum as a whole - we’ll see some differences below when we talk about Polygon. This allows transactions to be fast and cheap, while still taking advantage of the decentralization and security of Ethereum.
Apart from scale and cost, L2s also give developers more room for innovation and experimentation, since both can be conducted without affecting the Ethereum mainnet.
Types of L2 networks
There are a wide variety of L2s available in the market, but the most popular solutions fall into one of three categories:
- Optimistic rollups
- ZK rollups
- Sidechains
Let’s look at each one.
Optimistic rollups
Optimistic rollups are a type of scalability solution for the Ethereum network, falling under a broader category called rollups. Rollups are designed to bundle multiple transactions together and settle them on the Ethereum blockchain as a single transaction.
In optimistic rollups, transactions conducted on-chain are assumed to be correct by default. This is a key feature that allows for significant scalability and reduction in costs.
However, optimistic rollups are not without checks and balances. They have mechanisms in place for challenging and verifying transactions if necessary. One such mechanism is a time window known as a challenge period. During this period, anyone can challenge the results of a rollup transaction by computing a fraud proof.
For example, if a transaction is added to a block and ends up being challenged during the challenge period, the rollup protocol re-executes the transaction and updates the rollup's state based on the outcome of this fraud proofing.
If the challenge proves successful, penalties are incurred. Specifically, the sequencer responsible for including the incorrectly executed transaction in a block is penalized.
After resolving any challenges, all transactions are summarized, and their proofs are submitted to the Ethereum mainnet. This process ensures that optimistic rollups are compatible with Ethereum and other EVM-based blockchains while still offering substantial scalability benefits.
Optimism is the most popular and robust optimistic rollup solution available in the market today.
ZK rollups
ZK rollups are another kind of rollup solution that leverages zero-knowledge proofs to ensure the validity and verifiability of transactions. ZK rollups are capable of conducting massive computations off-chain, creating zero-knowledge proofs of these transactions, and providing a mechanism to verify said transactions without revealing any private, sensitive data.
zkEVMs are a special type of ZK rollup that is fully EVM (Ethereum Virtual Machines) compatible. In other words, it is possible to build and deploy on these chains using tools and code you already know from the main Ethereum chain.
Some of the most popular zkEVMs rollup solutions include Polygon zkEVM and Linea.
Sidechains
There is some debate on whether sidechains should be considered L2s. This is because, unlike other L2 solutions, sidechains operate as completely independent chains with their own set of consensus mechanisms and transaction rules. They interface with the main chain through bridges that enable the bidirectional flow of data and assets.
That said, some sidechains like Polygon do interface regularly with Ethereum and create checkpoints for transactions conducted on it.
Exploring Ethereum L2 networks with Infura
Infura is a world-class node provider that gives us access to RPC endpoints. These endpoints, in turn, enable you to connect with major blockchain and L2 networks available in the market today, see here for a full list.
Together with Truffle, Infura makes it extremely simple to connect to a particular chain.
In the next few sections, we’ll look in more detail at each L2 and how you can connect to them using Infura. First, though, let’s set up a barebones project that will serve as our base example. Then we’ll walk through the details of each L2.
Creating your project on an L2 network
Step 1: Create an Infura account
In order to get access to L2 RPC endpoints, you first need to sign up for an Infura account.
Once you create an account, go to the Dashboards page. Then click Create New API Key on the top right.

For the network, choose the default Web3 API. You can name the key anything you want.
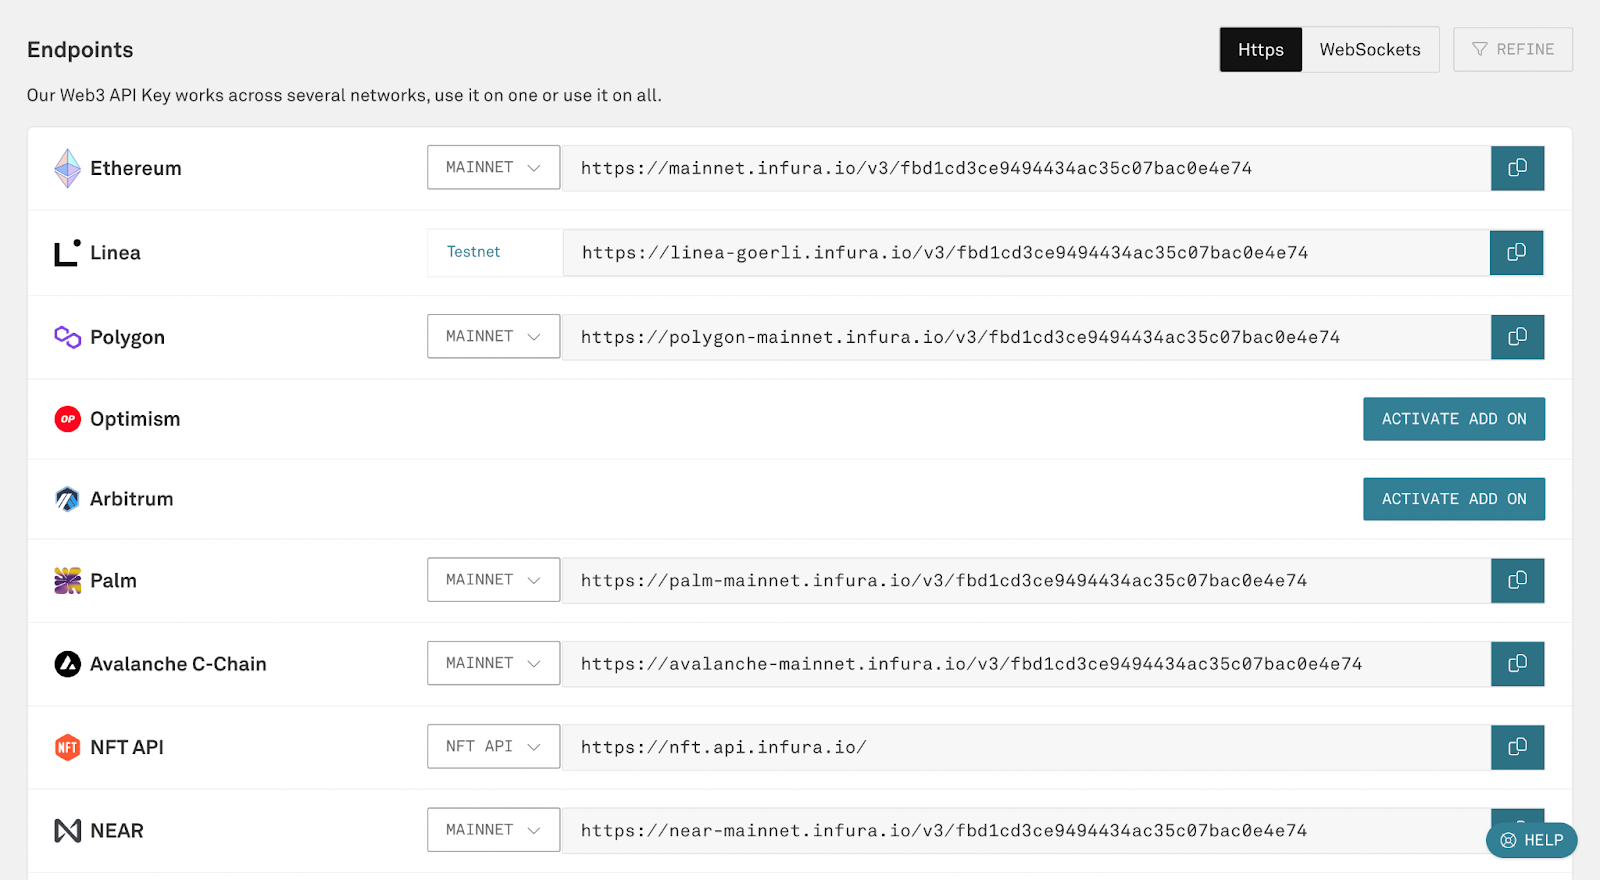
Now you will be redirected to your project’s dashboard page which will contain an Endpoints section. This contains the RPC endpoints for every blockchain and L2 supported by Infura. You’ll need these endpoints later on as you connect to each network.
Step 2: Install NPM and Node
In order to create a Truffle project, you need to install Node and npm on your local machine. Confirm installation by checking the version numbers of both by running:
$ node -v
$ npm -v
Step 3: Create a Truffle project
Next, install the Truffle npm package globally by running:
$ npm install -g truffle
Now let’s create a Node project and instantiate a new Truffle project. We’ll also install other necessary packages such as HD Wallet Provider (which allows you to interface with a crypto wallet) and dotenv (which allows you to keep your credentials secret).
$ mkdir infura-l2 && cd infura-l2
$ npm init -y
$ truffle init
$ npm install @truffle/hdwallet-provider dotenv
Step 4: Write a smart contract
In your new Truffle project, you can create smart contracts in the contracts folder. For this tutorial, we’re not really interested in the internals of the contract, so we’re just going to use the Hello World contract offered to us by Solidity by Example.
Create a new file called Demo.sol in the contracts folder, and add the following code:
// SPDX-License-Identifier: MIT
pragma solidity ^0.8.17;

contract HelloWorld {
    string public greet = "Hello World!";
}
Step 5: Install a crypto wallet
In order to deploy contracts and conduct transactions on Ethereum, you need a wallet and a little ETH for gas.
If you haven’t already, install MetaMask—the most popular and trusted wallet available.
MetaMask will prompt you to complete a series of steps to set up your first wallet. One of those steps will be a wallet recovery phrase. Store this safely and keep this private. You will not only need it later on in this tutorial but it’s needed to restore the wallet in the future. Also, anyone with this phrase will have access to your wallet.
Once the wallet is set up, you should see something like this:
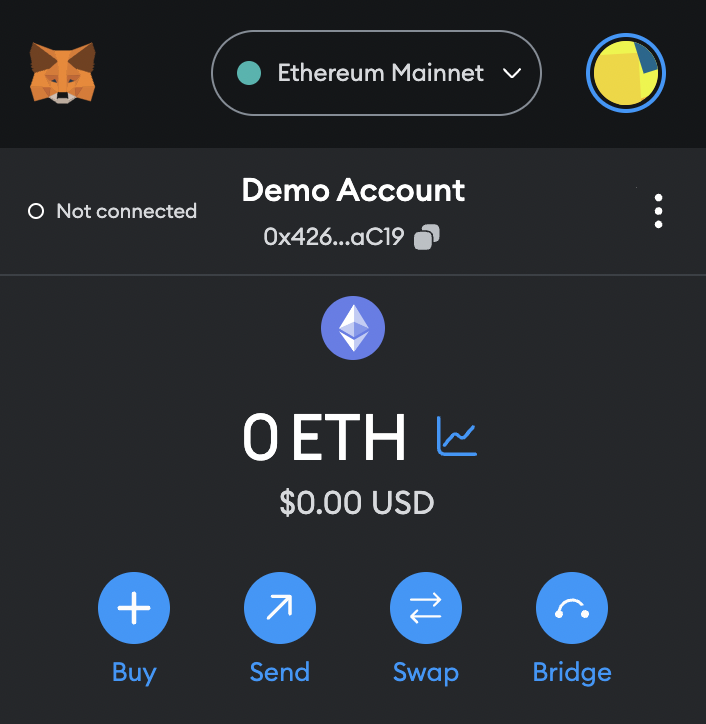
From the network drop-down, click on Show Test Networks. Some L2s such as Linea are automatically configured on MetaMask. Others you’ll need to configure manually as you need them.
Step 6: Create a .env file
Let’s go back to our project repository, and create a new file called .env in the root directory. Add the following information to this file.
MNEMONIC = "<Your-MetaMask-Secret-Recovery-Phrase>"
INFURA_API_KEY = “<Infura API Key>”
You can get the API key from your Infura API Key dashboard. Every RPC endpoint will have a different base URL but will share the same key.
Step 7: Write the deployment script
The script we’ll use to deploy our contract will be agnostic to the network we are deploying to.
In the migrations folder of your Truffle project, create a new file called 1_deploy_migrations.js and add the following code:
// Get instance of the demo contract
const demoContract = artifacts.require("Demo");

module.exports = function (deployer) {
    // Deploy the contract
    deployer.deploy(demoContract);
};
We’re all set!
Deploying a smart contract to popular L2 networks
Now we’re going to walk through how to use Infura to connect to and deploy our contract to, the following L2s.
- Linea
- Polygon zkEVM
- Optimism
- Arbitrum
- Starknet
For each L2, we’ll give a short description of that L2 and how it works, and then follow four steps to configure and deploy to the network:
- Configure MetaMask.
- Obtain gas.
- Configure truffle.config.js.
- Deploy the contract using the migration script (from step 7 above).
Linea
Linea is a zkEVM rollup solution created by ConsenSys that brings the best of both worlds: the ease of developing on an EVM-based chain, and the improvement in scalability and cost savings of a ZK rollup. Linea is a developer-first zk rollup, delivering the benefits of zkEVM while supporting a seamless developer environment with native integrations to existing EVM tools.
You can read and learn more about Linea in the official docs.
Now, let’s connect to Linea and deploy our contract.
Configure MetaMask: Linea comes pre-configured on MetaMask. All you need to do is choose it from the Network drop-down.
Obtain gas: You can obtain Linea test tokens from the Infura Linea faucet.
Configure script: Add the following code to truffle.config.js.
require('dotenv').config();
const HDWalletProvider = require('@truffle/hdwallet-provider');
const { MNEMONIC, INFURA_API_KEY } = process.env;

module.exports = {
  networks: {
    development: {
      host: "127.0.0.1",
      port: 8545,
      network_id: "*"
    },
    linea: {
      provider: () => new HDWalletProvider(MNEMONIC, `https://linea-goerli.infura.io/v3/${INFURA_API_KEY}`),
      network_id: '59140',
    }
  }
};
You can now deploy the contract to Linea by running the following command:
$ truffle migrate –-network linea
Polygon
Polygon is a sidechain created by Polygon Labs. Polygon is one of the most popular L2s and is EVM-compatible. Although it’s debatable if Polygon is a true L2, it does offer the same primary advantages that L2s do: low costs and high scalability.
You can learn more about Polygon in their docs.
Now let’s connect to Polygon and deploy our contract.
Configure MetaMask: To configure Polygon (mainnet) and Polygon Mumbai (testnet) on MetaMask, click on Add Network in the Network drop-down of MetaMask and add the following details:
Polygon Mainnet
- Network Name: Polygon
- RPC URL: <Infura Polygon URL>
- Chain ID: 137
- Currency Symbol: MATIC
- Block Explorer URL: https://polygonscan.com
Polygon Mumbai
- Network Name: Mumbai
- RPC URL: <Infura Polygon Mumbai URL>
- Chain ID: 80001
- Currency Symbol: MATIC
- Block Explorer URL: https://mumbai.polygonscan.com
Obtain gas: You can obtain Polygon Mumbai test tokens from the Polygon faucet.
Configure script: Configure Mumbai on Truffle by adding the following code to truffle.config.js:
require('dotenv').config();
const HDWalletProvider = require('@truffle/hdwallet-provider');
const { MNEMONIC, INFURA_API_KEY } = process.env;

module.exports = {
  networks: {
    development: {
      host: "127.0.0.1",
      port: 8545,
      network_id: "*"
    },
    mumbai: {
      provider: () => new HDWalletProvider(MNEMONIC, `https://polygon-mumbai.infura.io/v3/${INFURA_API_KEY}`),
      network_id: '80001',
    }
  }
};
You can now deploy the demo contract to Mumbai by running the following command:
$ truffle migrate –-network mumbai
Optimism
Optimism is an EVM-compatible, layer 2, rollup scaling solution with single-round fault proofs (as compared to Arbitrum below). Optimism has become one of the key L2s as Coinbase’s new L2—Base—is being built on top of the Optimism stack architecture.
For more details, check out the Optimism docs.
Now let’s connect to Optimism and deploy our contract.
Configure MetaMask: To configure Optimism and the Optimism Goerli Testnet on MetaMask, click on Add Network in the Network drop-down of MetaMask and add the following details.
Optimism
- Network Name: Optimism
- RPC URL: <Infura Optimism URL>
- Chain ID: 10
- Currency Symbol: oETH
- Block Explorer URL: https://optimistic.etherscan.io
Optimism Goerli
- Network Name: Optimism Goerli
- RPC URL: <Infura Optimism Goerli URL>
- Chain ID: 420
- Currency Symbol: oETH
- Block Explorer URL: https://goerli-optimism.etherscan.io
Obtain gas: You can obtain Optimism Goerli test tokens from the Optimism faucet.
Configure script: Configure Optimism Goerli on Truffle by adding the following code to truffle.config.js:
require('dotenv').config();
const HDWalletProvider = require('@truffle/hdwallet-provider');
const { MNEMONIC, INFURA_API_KEY } = process.env;

module.exports = {
  networks: {
    development: {
      host: "127.0.0.1",
      port: 8545,
      network_id: "*"
    },
    opti_goerli: {
      provider: () => new HDWalletProvider(MNEMONIC, `https://optimism-goerli.infura.io/v3/${INFURA_API_KEY}`),
      network_id: '420',
    }
  }
};
You can now deploy the demo contract to Optimism Goerli by running the following command:
$ truffle migrate –-network opti_goerli
Arbitrum
Arbitrum is an optimistic rollup solution (similar to Optimism above) developed by Offchain Labs (the same team behind Optimism). The key differences between the two are:
- While Optimism uses the EVM, Arbitrum uses its own AVM (Arbitrum Virtual Machine) which allows it to support all EVM-compiled languages, not just Solidity.
- Arbitrum uses multi-round fraud proofs that are executed off-chain. Optimism uses single-round proofs on layer 1.
For more information on Arbitrum, check out their docs.
Now let’s connect to Arbitrum and deploy our contract.
Configure MetaMask: To configure Arbitrum and the Arbitrum Goerli Testnet on MetaMask, click on Add Network in the Network drop-down of MetaMask and add the following details.
Arbitrum
- Network Name: Arbitrum
- RPC URL: <Infura Arbitrum URL>
- Chain ID: 42161
- Currency Symbol: aETH
- Block Explorer URL: https://arbiscan.io
Arbitrum Goerli
- Network Name: Arbitrum Goerli
- RPC URL: <Infura Arbitrum Goerli URL>
- Chain ID: 421613
- Currency Symbol: aETH
- Block Explorer URL: https://goerli.arbiscan.io
Obtain gas: You can obtain Arbitrum Goerli test tokens from one of these faucets.
Configure script: Configure Arbitrum Goerli on Truffle by adding the following code to truffle.config.js:
require('dotenv').config();
const HDWalletProvider = require('@truffle/hdwallet-provider');
const { MNEMONIC, INFURA_API_KEY } = process.env;

module.exports = {
  networks: {
    development: {
      host: "127.0.0.1",
      port: 8545,
      network_id: "*"
    },
    arbi_goerli: {
      provider: () => new HDWalletProvider(MNEMONIC, `https://arbitrum-goerli.infura.io/v3/${INFURA_API_KEY}`),
      network_id: '421613',
    }
  }
};
You can now deploy the demo contract to Arbitrum Goerli by running the following command:
$ truffle migrate –-network arbi_goerli
Starknet
Starknet is a ZK rollup layer 2 network by StarkWare that uses the Cairo programming language to build Ethereum apps using cryptographic systems called STARKS. Starknet offers a very high TPS combined with a very low computational cost.
For Starknet, we can’t use the above smart contract/setup as Starknet is not EVM compatible (we can’t use Solidity) and can’t be added to Metamask. But you can check out the Infura documentation for how to get started and connect.
Scale your applications with Infura
L2s are the key to the future of Ethereum. Without it, the network is expensive, slow, and nearly impossible to scale. But with L2s, technology can keep up with the pace of adoption and with Infura’s RPC endpoints, you can connect with every major L2 solution available and explore the possibilities.
Dive deeper into the world of scaling with resources such as the developer's guide to the Web3 stack. For a holistic view of scalability, explore the Infura path to scalability eBook and for the latest in Ethereum development, stay updated with the Metamask developers blog.