Improve Your Dapp’s UX with User Feedback Forms
Learn how to improve your dapp’s UX by integrating a feedback form and drive user engagement.


Learn how to improve your dapp’s UX by integrating a feedback form and drive user engagement.
As Web3 dapps gain popularity, we're witnessing the emergence of NFT marketplaces and decentralized exchanges that cater to millions of users and manage billions of dollars. However, the user experience for some of these dapps leaves much to be desired.
One effective strategy to enhance the UX is by gathering user feedback. This includes insights into what users enjoy, their grievances, features they'd like removed or added, and more.
In this article, we will delve into obtaining this feedback through a decentralized form. Specifically, we'll employ Consensys' Form-XChange to capture data about user experiences, enabling us to refine your app's design.
Why good UX matters for your dapp
For web3 applications to achieve widespread adoption, their user interface needs to rival the intuitiveness of popular web and smartphone apps. This user-friendliness is pivotal for both the success of your dapp and the broader web3 ecosystem.
The Benefits of a great UX includes:
- Higher Adoption Rates: Presently, dapps cater primarily to individuals well-versed in blockchains, wallets, and cryptocurrencies. Simplifying the user experience would allow even novices to navigate with ease.
- Improved User Retention: A sleek UX doesn't just attract users; it keeps them. Conversely, cumbersome interfaces tend to repel users.
- Cost Efficiency in Development: By proactively gathering feedback, future adjustments to the application tend to be fewer and less drastic.
- Competitive Advantage: While a stellar UX is universally beneficial across industries, it's an exceptionally effective strategy for outpacing competitors in the dapp space.
- Boosted Revenue & Brand Recognition: Think of iconic tech products like the Apple MacBook or Instagram. Their user-friendliness, resulting in immense popularity, has not only driven impressive revenues but has also built powerful brand identities.
Now, let's dive into a tutorial on enhancing your dapp's UX with user feedback forms. We'll also explore how Form-XChange simplifies this feedback collection process.
Create a UX Feedback Form
Form-XChange is a ready-to-deploy solution for decentralized forms in the Ethereum ecosystem. By using it to implement your user feedback, you don’t have to worry about creating a template form contract, a factory contract, or a frontend to interface with these contracts. It’s all built-in!
Step 1: Create an Infura account
To implement your feedback form, you need an Infura account - it’s free. This allows you to:
- Acquire a Linea RPC endpoint.
- Access the Infura Linea faucet.
The RPC endpoint will allow you to connect your project to the Linea testnet and deploy your contracts. The faucet gets you LineaETH, which you can use to pay for transactions.
After signing up, navigate to the dashboard and select Create New API Key in the top right.
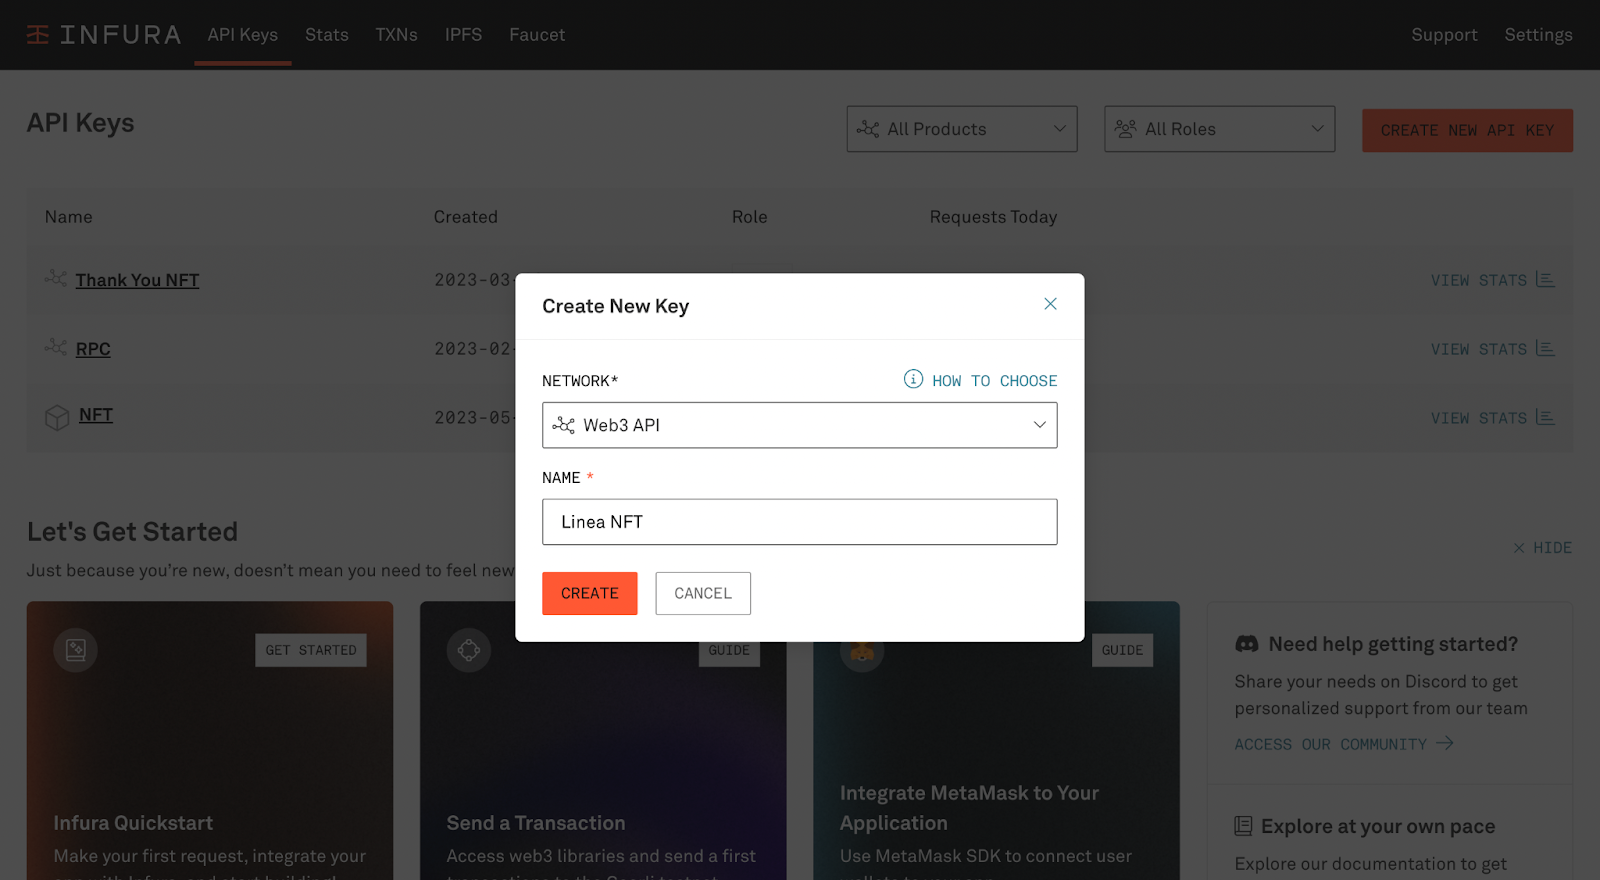
For network, choose Web3 API You can name the project whatever you want.
After creating your project, you should be redirected to the project’s dashboard where you will see an Endpoints section containing all RPC endpoints, including the Linea testnet. Take note of this; you’ll need it later.
Step 2: Install the MetaMask wallet and acquire LineaETH
We’ll deploy our decentralized feedback form to the Linea blockchain.
If you’re not familiar with Linea, it’s a zk-EVM scaling solution that allows us to enjoy the security benefits of Ethereum while driving transaction costs down and ease of scalability up.
In order to deploy our form to Linea and interact with it, we need a self-custodial EVM wallet. You can download the MetaMask wallet for free as a browser extension here.
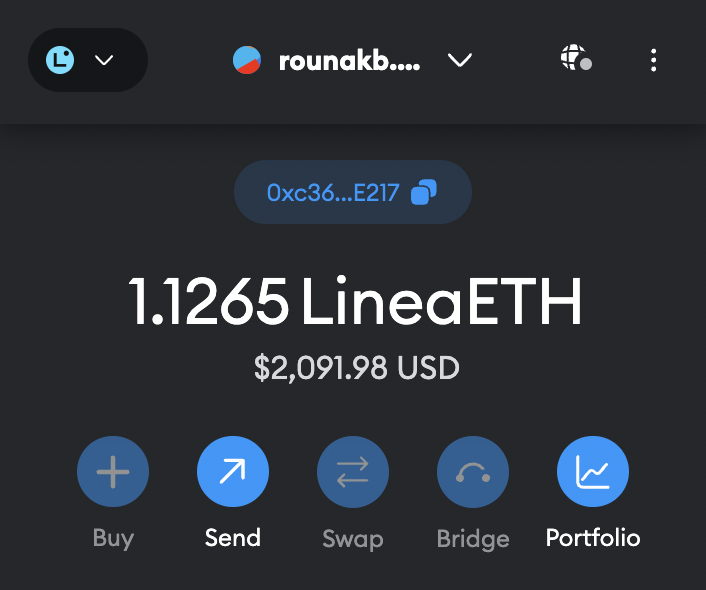
After setting up your wallet, navigate to the top left of your wallet extension and click on the Network drop-down. From there, toggle to Show Test Networks. This will make the Linea testnet visible since MetaMask comes automatically configured with Linea. Your extension should look something like this:
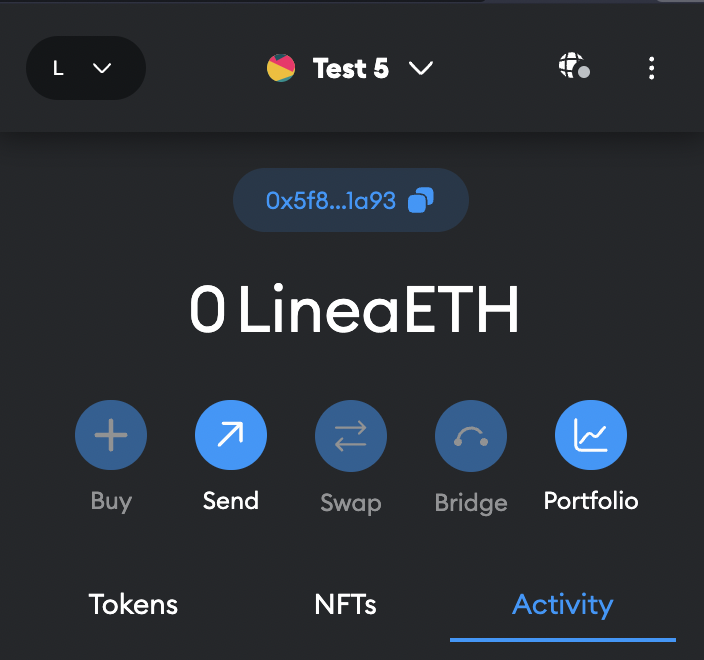
Notice that we have a balance of 0 LineaETH. Deploying our form will cost gas in the form of LineaETH. Fortunately for us, since we’re working on a testnet, we can get LineaETH for free from the Linea faucet.
Step 3: Clone the Form-XChange repository
As stated earlier, we’ll be using Consensys’ open-source feedback form solution Form-XChange. This will allow us to deploy a powerful, decentralized feedback form out of the box.
In order to clone and use this repository, we need node and npm installed on our local machine.
After installation, make sure everything is working okay by checking for version numbers:
$ node -v
$ npm -v
We’re all set! Let’s now clone the repository and install all dependencies. For context, the GitHub repository we’re cloning can be found here.
$ git clone https://github.com/Consensys/Form-XChange ux-forms
$ cd ux-forms
$ npm install
Once the commands have successfully run, open the repository in your favorite code editor.
Step 4: Create the factory smart contract
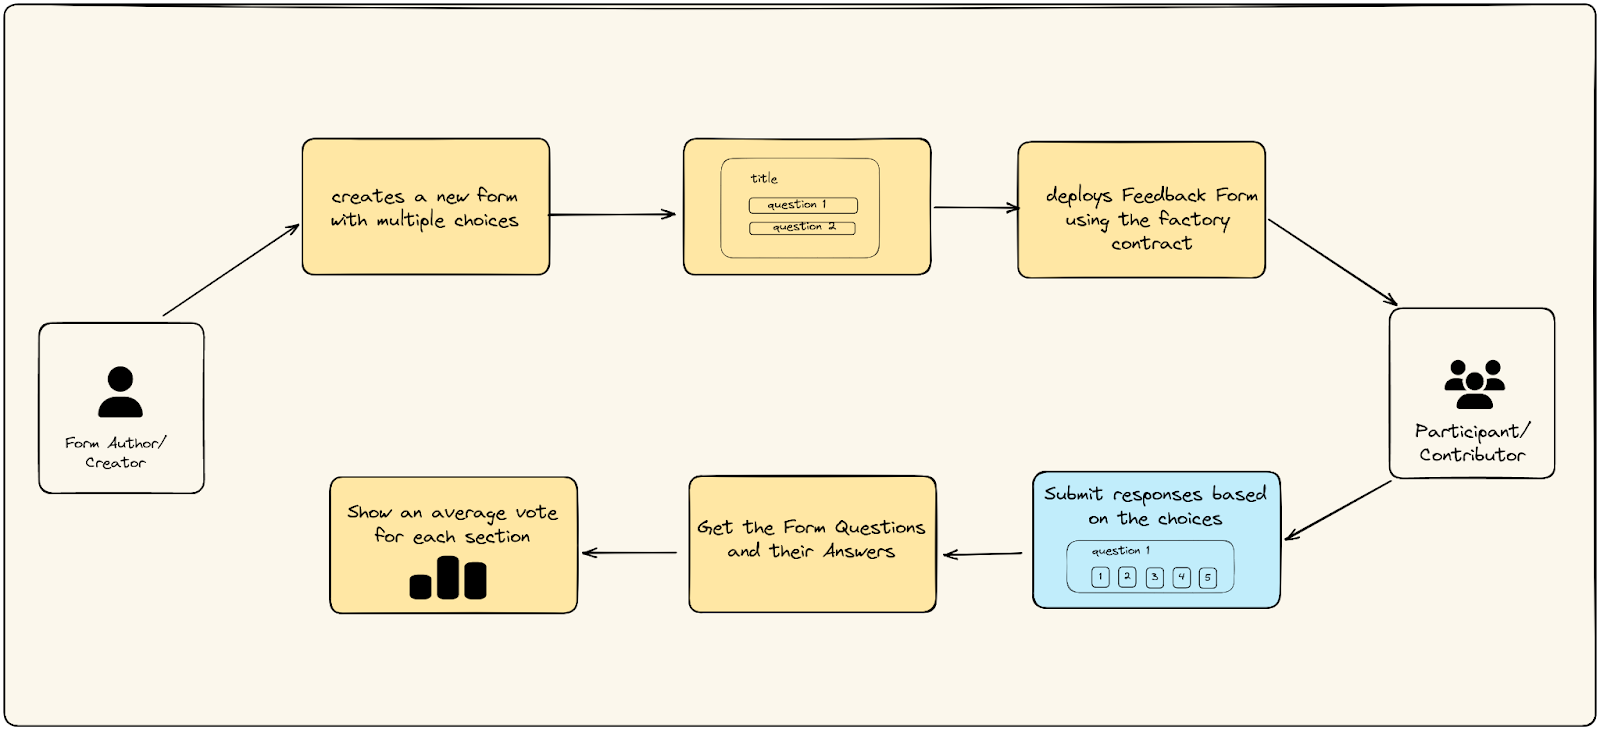
Let’s briefly walk through how decentralized forms work on Form-XChange.
Every form is represented as a single distinct contract. These contracts effectively allow the end user to record feedback and the owner to analyze the recorded feedback.
While it is possible to directly author this contract and deploy it, it becomes extremely repetitive to do so when you need multiple forms.
In such cases, a factory smart contract comes in handy. This contract, as its name suggests, is capable of deploying other smart contracts with various configurations and keeping track of all the contracts it has ever deployed.
In this step, we will deploy a form factory contract that will allow us to create multiple forms directly from the UI. This way, we’ll deploy a contract from the terminal only once; every subsequent contract deployment will be done through the Next.js app we’ll deploy in a later step.
So let’s deploy our factory smart contract!
Navigate to the subfolder that contains the smart contracts.
$ cd packages/form-XChange
In this folder, you will see another folder named contracts. This contains the two main contracts we described earlier: FeedbackForm and FeedbackFormFactory.
Although it is possible to modify the contracts according to your needs, we’ll stick to the basic configuration in this tutorial.
Let’s now proceed to deploy the FeedbackFormFactory. It looks something like this:
// SPDX-License-Identifier: MIT
// Tells the Solidity compiler to compile only from v0.8.13 to v0.9.0
pragma solidity ^0.8.13;
import "./FeedbackForm.sol";

contract FeedbackFormFactory {
    FeedbackForm[] public feedbackForms;

    function createFeedbackForm(
        string[] memory _questions,
        string memory _title,
        string memory _description
    ) public returns (FeedbackForm) {
        FeedbackForm feedbackForm = new FeedbackForm(_title, _description);
        feedbackForm.setQuestions(_questions);
        feedbackForms.push(feedbackForm);
        return feedbackForm;
    }

    function getFeedbackForms() public view returns (FeedbackForm[] memory) {
        return feedbackForms;
    }

    function getFeedbackFormById(uint _id) public view returns (FeedbackForm) {
        return feedbackForms[_id];
    }

    function getAllQuestions(
        uint _id
    ) public view returns (FeedbackForm.Question[] memory) {
        return feedbackForms[_id].getAllQuestions();
    }

    function submitFeedback(uint _id, uint[] memory _feedback) public {
        feedbackForms[_id].submitFeedback(_feedback);
    }
}
In the root folder, create a file named .env and add your wallet’s recovery phrase in the following format:
MNEMONIC = "< YOUR METAMASK WALLET RECOVERY PHRASE >"
Let’s now configure our project to connect with Linea and our MetaMask wallet. Replace the contents of truffle.config.js with the following:
require("dotenv").config();
const mnemonic = process.env["MNEMONIC"];

const HDWalletProvider = require("@truffle/hdwallet-provider");

module.exports = {
  networks: {
    linea: {
      provider: () =>
        new HDWalletProvider(mnemonic, `< LINEA RPC ENDPOINT >`),
      network_id: 59140,
      chain_id: 59140,
    },
  },
  compilers: {
    solc: {
      version: "0.8.13",
    },
  },
};
Believe it or not, we’re all set to deploy the contract! Do so by running the following command:
$ npm run linea
You can check that everything has executed correctly by looking for terminal output that looks something like this:
> form-xchange@0.0.0 linea
> npm run compile && npm run generate-types && npm run migrate:linea


> form-xchange@0.0.0 compile
> truffle compile


Compiling your contracts...
===========================
> Everything is up to date, there is nothing to compile.

> form-xchange@0.0.0 generate-types
> typechain --target=truffle-v5 'build/contracts/*.json'

Successfully generated 5 typings!

> form-xchange@0.0.0 migrate:linea
> truffle migrate --network linea


Compiling your contracts...
===========================
> Everything is up to date, there is nothing to compile.


Starting migrations...
======================
> Network name:    'linea'
> Network id:      59140
> Block gas limit: 61000000 (0x3a2c940)


1_deploy_contracts.js
=====================

   Replacing 'FeedbackFormFactory'
   -------------------------------
   > transaction hash:    0x50ba2c362cb463d0b763ba5f092e3f1a8591dd9cd358f2feda035438ce02cee0
   > Blocks: 2            Seconds: 21
   > contract address:    0xBDAb1F857dC80968022784cc1C868820BFD2F7c5
   > block number:        1099121
   > block timestamp:     1688991002
   > account:             0xc361Fc33b99F88612257ac8cC2d852A5CEe0E217
   > balance:             0.62878173171592041
   > gas used:            2636875 (0x283c4b)
   > gas price:           2.500000007 gwei
   > value sent:          0 ETH
   > total cost:          0.006592187518458125 ETH

   > Saving artifacts
   -------------------------------------
   > Total cost:     0.006592187518458125 ETH

Summary
=======
> Total deployments:   1
> Final cost:          0.006592187518458125 ETH
The most important piece of information in this output is the contract address. Take note of it. In our case, it’s 0xBDAb1F857dC80968022784cc1C868820BFD2F7c5.
Step 5: Create the Next.js dapp
We’ll now create a Next.js frontend that serves two purposes:
- Allows the owner of the factory contract to create customized forms.
- Allows the end user of your dapps to access forms and record responses.
The Next.js app is contained in a separate subfolder of the project. Navigate there using the following command:
$ cd ../../apps/web
Next, let’s ensure that our app can interface with the factory contract we deployed in the previous step. We can do this by adding the following contract address to the lib/contract.ts/config.ts file:
export const FEEDBACK_FACTORY_CONTRACT_ADDRESS = "<FACTORY CONTRACT ADDRESS>";
Since this is a separate project, we will have to create a separate .env file. However, this time, we will supply the Infura API key. Note that this is different from our Linea endpoint as the Infura API key is what you see at the top of your project’s dashboard page.
INFURA_KEY=<INFURA API KEY>
To be able to view your Next.js on your local machine run the following command:
$ npm run dev
Your app should be live at localhost:3000 and should look something like this:
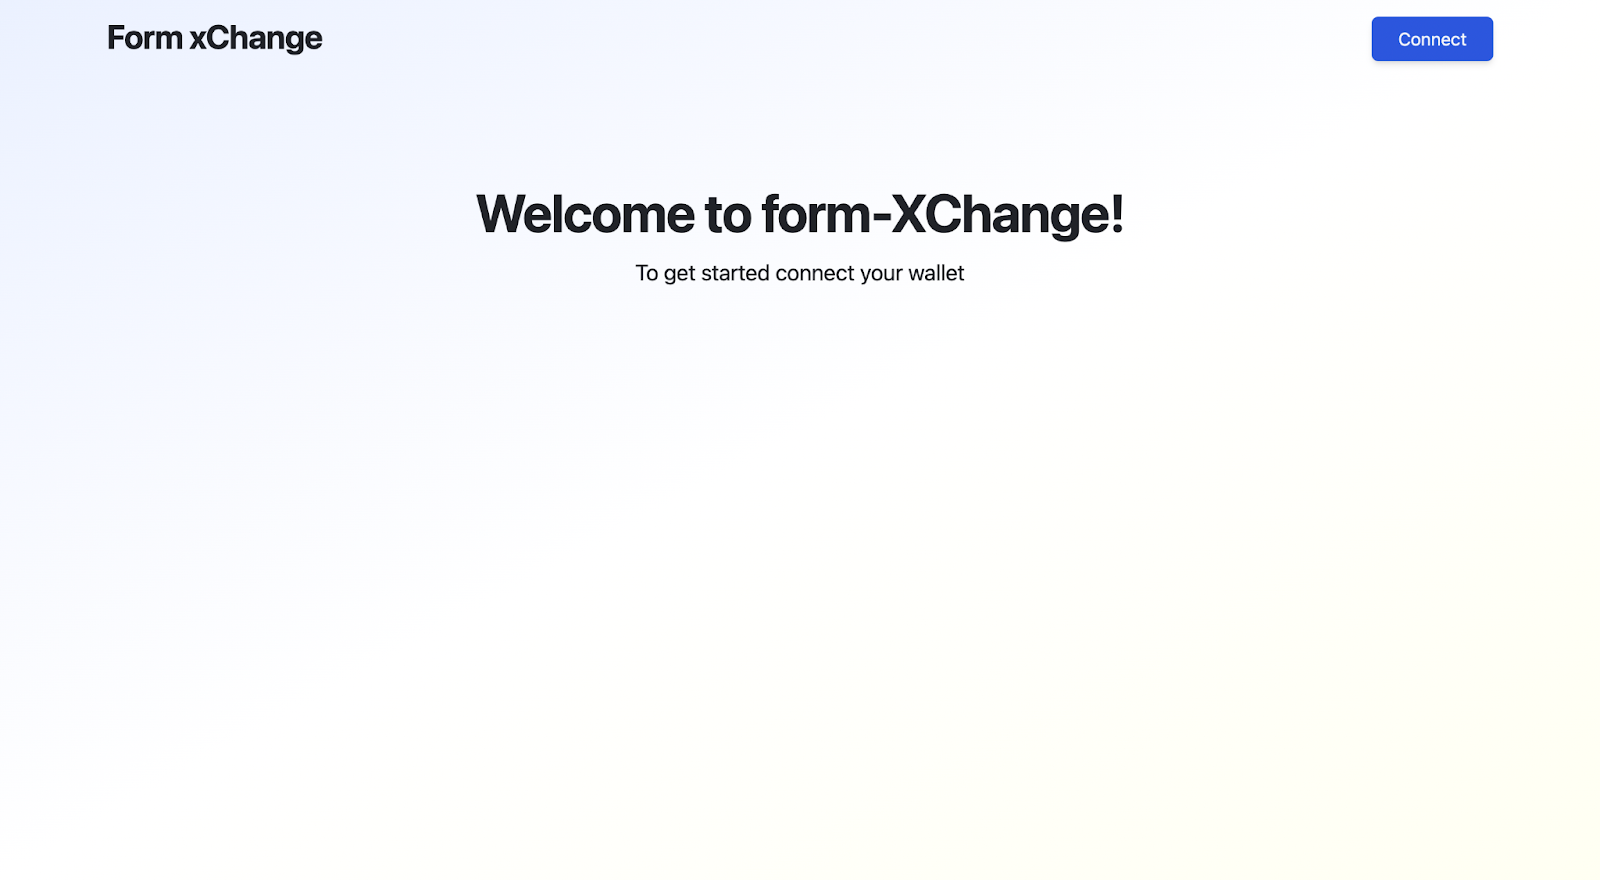
Note that to be able to share this form with your actual users, you will need to deploy your Next.js application to a production environment like Vercel.
Step 6: Create demo feedback forms
After connecting your wallet, you should see the Connect button replaced with New Form. Here, you will be able to create a form that will collect information about your app’s user experience.
There are potentially dozens of questions you can ask users about your app’s UX. Some examples include:
- How easy was it to get started with our app?
- Were you able to find what you were looking for quickly?
- Did you encounter any issues or glitches while using the app?
- Was the text easy to read and understand?
- Were there any areas where you felt overwhelmed with information or options?
- How satisfied are you with our app overall?
- Would you recommend our app to a friend or colleague?
Take note that in our version of the form, you can only record responses on a scale. In order to record textual responses, you will have to modify the FeedbackForm contract. We leave that as an exercise for you to complete independently.
On the Create Form page of your Next.js app, try adding some of the questions listed above.

Once you click on Create Form, you will be redirected to complete a MetaMask transaction.

Once this transaction is confirmed, navigate back to the home page. Now, users will be able to record responses on your forms!

You will also be able to read responses from your forms. At the moment, feedback is simply a collection of integers that indicate the degree to which your users are happy or unhappy. You can change this, of course, to make it more descriptive.
Hint: Take a look at the Question struct in the FeedbackForm contract.
Start collecting feedback today!
Congratulations! You've successfully deployed a form factory contract, used it to deploy a customized feedback form, and spun up a Next.js app to create forms and record responses.
You can further customize the features to better suit your application's needs. Additionally, you can deploy this form to the Linea mainnet or any other EVM-compatible mainnet to gather real user feedback.