How to Use .env to Enhance Basic Security Within Your DApp
Are you excited by blockchain but don’t have a great deal of experience coding? It can be easy to fall down a rabbit hole of technical tutorials that make assumptions regarding your initial development knowledge. A particularly important topic to grasp is basic security within your code.


Are you excited by blockchain but don’t have a great deal of experience coding? It can be easy to fall down a rabbit hole of technical tutorials that make assumptions regarding your initial development knowledge. A particularly important topic to grasp is basic security within your code.
As you begin to build out your very own dApp, you will have to include information such as an Infura API key, along with a mnemonic.
If you are new to coding, this is the equivalent of giving a stranger your social security number and keys to your home. Once this information is public, there is no definitive way to ensure it hasn’t been captured by a person or web crawler, which could result in malicious behavior.
So, how can we address this?
Thankfully, we can use dotenv along with git to protect our sensitive information within our project when / if we push to github.
Dotenv is a zero-dependency module that loads environment variables from a .env file into process.env, storing configuration in the environment separate from the code. It is often a convention for environment variables to be stored in a .env file or other mechanisms based on the server you are using.
Note: This article will focus on building out a project using Truffle and Infura.
In our project, we will need to run the following command:
npm i dotenv
Once the process in our terminal has been completed, we will want to make sure we have the dependency successfully installed. Head over to your package.json file and check to ensure that dotenv has been added under dependencies.

Next, at the root of our project, let’s create a .env file:

Here is where you will add all of the sensitive information that should not be shared.
We will make sure we can access our .env information in our truffle.config file. At the top of the truffle.config file, add the following:
require("dotenv").config
This will tell your project to load anything that is in the .env into an environment variable, granting you access to it.
Now, instead of having to put our Infura api key or mnemonic in an exposed file, we can import that information from our .env file.
When it comes to gaining access to our project key we are going to use, sign up to Infura and create a project. In your dashboard, you should see something similar to this:

The following code is an example between the usage of .env and exposed information within truffle.config:
const HDWalletProvider = require('@truffle/hdwallet-provider');
const infuraURL = 'https://rinkeby.infura.io/v3/<project id here>'
const mnemonic = "Your mnemonic here"
rinkeby: {
provider: () => new HDWalletProvider (mnemonic, infuraURL),
network_id: 4,
gas: 5500000,
confirmations: 2,
timeoutBlocks: 200,
skipDryRun: true
},
Imagine if you pushed this up to github. Anyone would have the ability to open your truffle.config file could take advantage of your exposed mnemonic and project id from Infura.
Let’s take a look at that same code and implement better security practices.
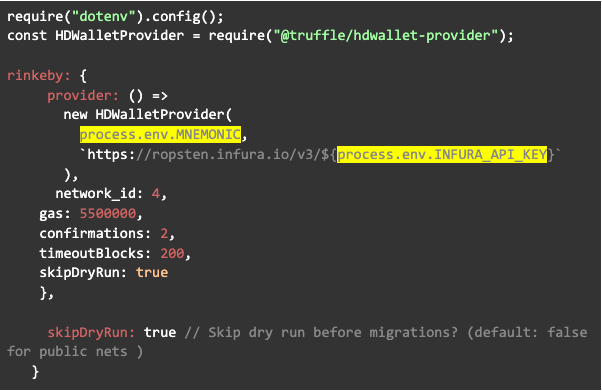
Notice how we are calling upon the information without having to directly add to our file.
One important detail, as of now even with an .env file: if you push this project to github, it will show the .env file, which would defeat the purpose!
Take a look for yourself.

This is where .gitignore comes into play. We will need to create a .gitignore file, so we can push this project up to github.
Without getting into git, a quick summary could be git is version control software that keeps track of all of your files and the versions of them. What .gitignore does is it tells git not to keep track of this file along with everything it contains.
If you want to dive deeper into git along with other foundational material, have a look at our Basic Training, a free course that helps ensure you have the fundamental tools when developing.
At our root (similar to the level our .env file lives), we will create a .gitignore. Inside of that file, we will add .env along with any other files you would rather not be pushed to github.
We can now push our project up to github and notice that our .env file is no longer exposed. Our sensitive information is now much more secure.

If you are experimenting with this, make sure you add your .env file to your .gitignore before pushing.
If you are running into issues, remember gitignore ignores only untracked files. If your files were committed in the past, they are now tracked by git. To ignore them, you first need to delete said files, git rm them, commit and then ignore.
Otherwise, you can delete the .env file and run
Git rm .env --cached
Here is a helpful link discussing the removal of sensitive data from a repo if it was previously committed and discusses how to clean the git history. Savvy attackers don't just look at the most recent repository info, they'll look at the history of it as well.
Note: If you come across it in documentation, a question you might have is
“What is env. example”
An env. example file, on the contrary to this tutorial, is actually included in the repository, it is used as an example file for you to know what KEY=VALUE pairs you need for your project. Most often, it is used to copy the .env file and then change the values.
Example of execution:
Enter to the project root directory using your terminal.
Check if .env the file exists or not.
If the file does not exist then create a file named .env.
Now execute the command
cp .env.local .env.
So the .env.sample file has all the ENV declarations defined but without their values. It helps other developers establish/set up the project without having to reverse-engineer the codebase.
So after git clone, you usually execute the command `cp .env.sample .env` and fill in the values with the Infura credentials as we saw in the example above.
Note: When you create a new repo using github, if you scroll down you should see the option to include a .gitignore file so you don’t have to create one yourself in the future.
Hopefully, you found this article on basic security practices helpful as you begin to develop your very own projects. Feel free to join our Discord if you want to continue the conversation, share projects, ideas, and join the community!