How to use ChatGPT to build a full stack dapp
ChatGPT can’t build a dapp on its own, but it can help you build yours! Learn how to with Infura, MetaMask, and Truffle.


ChatGPT can’t build a dapp on its own, but it can help you build yours! Learn how to with Infura, MetaMask, and Truffle.
In parts one and two of the Infura-ChatGPT series, you learned how ChatGPT can help with general smart contract development, as well as how to use this helpful AI tool for minting NFTs.
In the third and final part of this series, I’ll show you how to use ChatGPT, MetaMask, Infura, and Truffle to create and launch a dapp on Ethereum. We’ll use ChatGPT to generate the idea for what our dapp should be—and then perform some prompt engineering to have ChatGPT assist with all aspects of development.
Using AI for dapp development is a new and exciting opportunity ChatGPT has enabled, but it does come with some precautions. Check out this disclaimer from part two.
Step 1: Create an OpenAI account
Let’s start by creating our ChatGPT account. ChatGPT is a free tool offered by OpenAI. Once you’ve created your account, you can access the UI here.
It should look something like this:

Using ChatGPT is simple. You message with it just like you’d converse with a real person.
Try asking it a few things like: Which is the largest country in the world? What are the best hotels in London? and Can you suggest a few non-fiction books on psychology?
Let’s say you’re new to the world of web3 development and you want to build and deploy your first dapp on Ethereum. ChatGPT is excellent at brainstorming ideas.
Try the following prompt:
ChatGPT will give you a response that looks something like this:
Note that ChatGPT will not give you the same response even on identical prompts, so what you get won’t be exactly the same as the above.
The list of ideas it has generated is pretty impressive! For this tutorial, let’s go with the Decentralized Lottery idea. Feel free to pick one of the other ideas to work with as an alternative. The steps we’ll follow to create our smart contract and launch our dapp will largely be the same.
Step 2: Create a MetaMask wallet and acquire test ETH
In order to create, deploy, and interact with smart contracts on Ethereum, we’ll need a crypto wallet and gas tokens.
For the wallet, let’s use MetaMask. MetaMask is a decentralized, self-custodial wallet that is secure, reliable, and simple to use. Download and install MetaMask as a browser extension. Upon installation, MetaMask will prompt you to follow a series of steps to create your first wallet. In the process, you’ll be provided with a secret phrase. Take special care to store your seed phrase safely. If you lose it, you will lose access to your wallet.
Once your wallet is set up, click on the Network tab at the top right of the extension and then Show test networks.
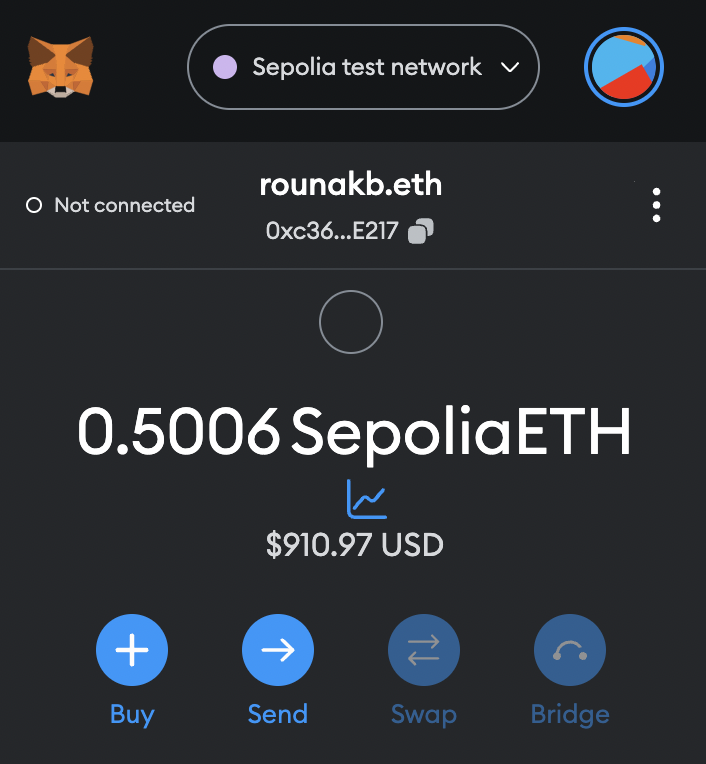
Once you’ve enabled test networks, select Sepolia from the network drop-down. We’ll use this test network to deploy our dapp. Deploying (and interacting with) a smart contract requires gas—which can be expensive on mainnet. On a test network like Sepolia, however, we can use SepoliaETH which is freely available from the Sepolia faucet. Once you’ve used the faucet, you should see a little of the test ETH in your wallet:
Step 3: Create an Infura account
The last preparation step is to sign up for an Infura account. Infura is a free, fast, and reliable RPC endpoint that allows us to connect to Ethereum (and Sepolia). It’s through these RPC endpoints that we can interact with the Sepolia (and eventually mainnet) blockchains.
Create your free Infura account, then navigate to your dashboard and create a new API key.

Use the default Web3 API network. You can name the key whatever you want.
This key gives you access to endpoints for many major blockchains, including Ethereum, Polygon, Optimism, Starknet, Near, and more. For our project, we’re interested in the Sepolia test network. The RPC endpoint we’ll use later in the code will be in the form of https://sepolia.infura.io/v3/<your API key>.
Step 4: Create a Truffle project
Now we’re ready to start coding. Let’s set up our Truffle project.
Truffle is a development environment for creating, testing and deploying Ethereum and EVM-based smart contracts. We’ll use it for nearly everything we need to write, test, and deploy our code in this project.
Before we can install Truffle, be sure you have node and npm installed on your local machine. Double-check by making sure you can see the version numbers when running the following commands.
$ node -v
$ npm -v
With node installed, setting up our development environment requires just a few commands.
$ mkdir lottery && cd lottery
$ npm init -y
$ npm install –save truffle
$ npx truffle init && npx truffle test
$ npm install @openzeppelin/contracts @truffle/hdwallet-provider dotenv
Here’s what we’re doing in the above:
- Creating an empty repository and set up a node project
- Installing Truffle
- Creating a barebones Truffle project
- Installing useful packages like OpenZeppelin (for ERC implementations), HD Wallet Provider (for wallet management), and Dotenv (for secret management).
Step 5: Create a lottery contract with ChatGPT
Now the fun part—we’re ready to ask ChatGPT to write our smart contract.
Remember that ChatGPT will not always give you a solution that is 100% correct. So we’ll want to be diligent, still, with the generated code. The easiest way to get the best code possible is by being as detailed as possible with our request.
Let’s write a follow-up prompt to create the lottery contract.
ChatGPT will generate a response that looks something like this:
The contract ChatGPT creates is largely correct. As ChatGPT itself correctly points out, it’s probably not appropriate to deploy this in a production environment. But for this example, it works great.
You can also prompt GPT to improve the contract (for example, using the Ownable functionality offered by OpenZeppelin instead of implementing it ourselves).
So let’s create a contract called DecentralizedLottery.sol in the contracts folder and add the following, slightly modified code.
// SPDX-License-Identifier: MIT
pragma solidity ^0.8.0;

contract DecentralizedLottery {
    address public owner;
    uint256 public ticketPrice;
    mapping(uint256 => address) public participants;
    uint256 public participantCount;
    bool public lotteryClosed;
    uint256 private randomSeed;

    event LotteryClosed(address winner, uint256 amount);
    event TicketPurchased(address participant);

    constructor(uint256 _ticketPrice) {
        owner = msg.sender;
        ticketPrice = _ticketPrice;
        participantCount = 0;
        lotteryClosed = false;
        randomSeed = 0;
    }

    function purchaseTicket() public payable {
        require(!lotteryClosed, "Lottery is closed");
        require(msg.value == ticketPrice, "Incorrect ticket price");

        participants[participantCount] = msg.sender;
        participantCount++;

        emit TicketPurchased(msg.sender);
    }

    function closeLottery() public {
        require(msg.sender == owner, "Only the owner can close the lottery");
        require(!lotteryClosed, "Lottery is already closed");

        lotteryClosed = true;

        uint256 winnerIndex = _generateRandomNumber() % participantCount;
        address payable winner = payable(participants[winnerIndex]);
        uint256 contractBalance = address(this).balance;

        emit LotteryClosed(winner, contractBalance);

        winner.transfer(contractBalance);
    }

    function _generateRandomNumber() private returns (uint256) {
        randomSeed = uint256(keccak256(abi.encodePacked(randomSeed, block.timestamp, block.prevrandao)));
        return randomSeed;
    }
}
Step 6: Configure Dotenv and Truffle
Let’s next configure our project to work with our wallet and our RPC endpoint.
In the root directory of our project, create a file called .env and add the following information:
INFURA_API_KEY = "https://sepolia.infura.io/v3/<Your-API-Key>"
MNEMONIC = "<Your-MetaMask-Secret-Recovery-Phrase>"
This file ensures that our sensitive information is not uploaded to public places like GitHub.
Next, replace the contents of truffle.config.js to work with the MetaMask wallet and the Infura RPC endpoint:
require('dotenv').config();
const HDWalletProvider = require('@truffle/hdwallet-provider');
const { INFURA_API_KEY, MNEMONIC } = process.env;

module.exports = {
  networks: {
    development: {
      host: "127.0.0.1",
      port: 8545,
      network_id: "*"
    },
    sepolia: {
      provider: () => new HDWalletProvider(MNEMONIC, INFURA_API_KEY),
      network_id: '11155111',
    },
  },
  compilers: {
    solc: {
      version: "0.8.19",
    }
  }
};
Compile the contract by running:
$ npx truffle compile
Step 7: Deploy the dapp to the Sepolia testnet
Let’s go back to ChatGPT again and this time ask it to help us deploy our contract to the Ethereum testnet.
Use the following prompt:
ChatGPT gives a response that looks something like this:
As is typical, the response given by ChatGPT is almost correct. The only obviously missing piece is setting the ticket price correctly and the naming convention adopted by Truffle.
Create a file called 1_deploy_contract.js and add the code created by ChatGPT.
const DecentralizedLottery = artifacts.require("DecentralizedLottery");

module.exports = async function (deployer) {
    try {
        // Deploy the DecentralizedLottery contract
        const ticketPrice = web3.utils.toWei('0.001', 'ether');
        await deployer.deploy(DecentralizedLottery, ticketPrice); // Set the ticketPrice here

        // Get the deployed instance
        const lotteryInstance = await DecentralizedLottery.deployed();

        console.log("DecentralizedLottery contract deployed at:", lotteryInstance.address);
    } catch (error) {
        console.error("Error deploying the contract:", error);
    }
};
As ChatGPT advised, deploy the contract using the following command:
$ npx truffle migrate –network sepolia
If all goes well, you should see an output that looks like this:
Compiling your contracts...

===========================

> Everything is up to date, there is nothing to compile.


Migrations dry-run (simulation)

===============================

> Network name:    'sepolia-fork'

> Network id:      11155111

> Block gas limit: 30000000 (0x1c9c380)


1_deploy_contract.js

====================


   Deploying 'DecentralizedLottery'

   --------------------------------

   > block number:        3498893

   > block timestamp:     1684259757

   > account:             0xc361Fc33b99F88612257ac8cC2d852A5CEe0E217

   > balance:             0.498960474971217066

   > gas used:            672264 (0xa4208)

   > gas price:           2.500000008 gwei

   > value sent:          0 ETH

   > total cost:          0.001680660005378112 ETH


DecentralizedLottery contract deployed at: 0xA4766Ceb9E84a71D282A4CED9fB8Fe93C49b2Ff7

   -------------------------------------

   > Total cost:     0.001680660005378112 ETH


Summary

=======

> Total deployments:   1

> Final cost:          0.001680660005378112 ETH


Starting migrations...

======================

> Network name:    'sepolia'

> Network id:      11155111

> Block gas limit: 30000000 (0x1c9c380)


1_deploy_contract.js

====================


   Deploying 'DecentralizedLottery'

   --------------------------------

   > transaction hash:    0x2a4b6eeaa354d2a4d156f0d562ca6ac7212b22a2131a54426178ec5a82a660d0

   > Blocks: 2            Seconds: 22

   > contract address:    0xA4766Ceb9E84a71D282A4CED9fB8Fe93C49b2Ff7

   > block number:        3498900

   > block timestamp:     1684259784

   > account:             0xc361Fc33b99F88612257ac8cC2d852A5CEe0E217

   > balance:             0.498960474970544802

   > gas used:            672264 (0xa4208)

   > gas price:           2.500000009 gwei

   > value sent:          0 ETH

   > total cost:          0.001680660006050376 ETH


DecentralizedLottery contract deployed at: 0xA4766Ceb9E84a71D282A4CED9fB8Fe93C49b2Ff7

   > Saving artifacts

   -------------------------------------

   > Total cost:     0.001680660006050376 ETH


Summary

=======

> Total deployments:   1

> Final cost:          0.001680660006050376 ETH
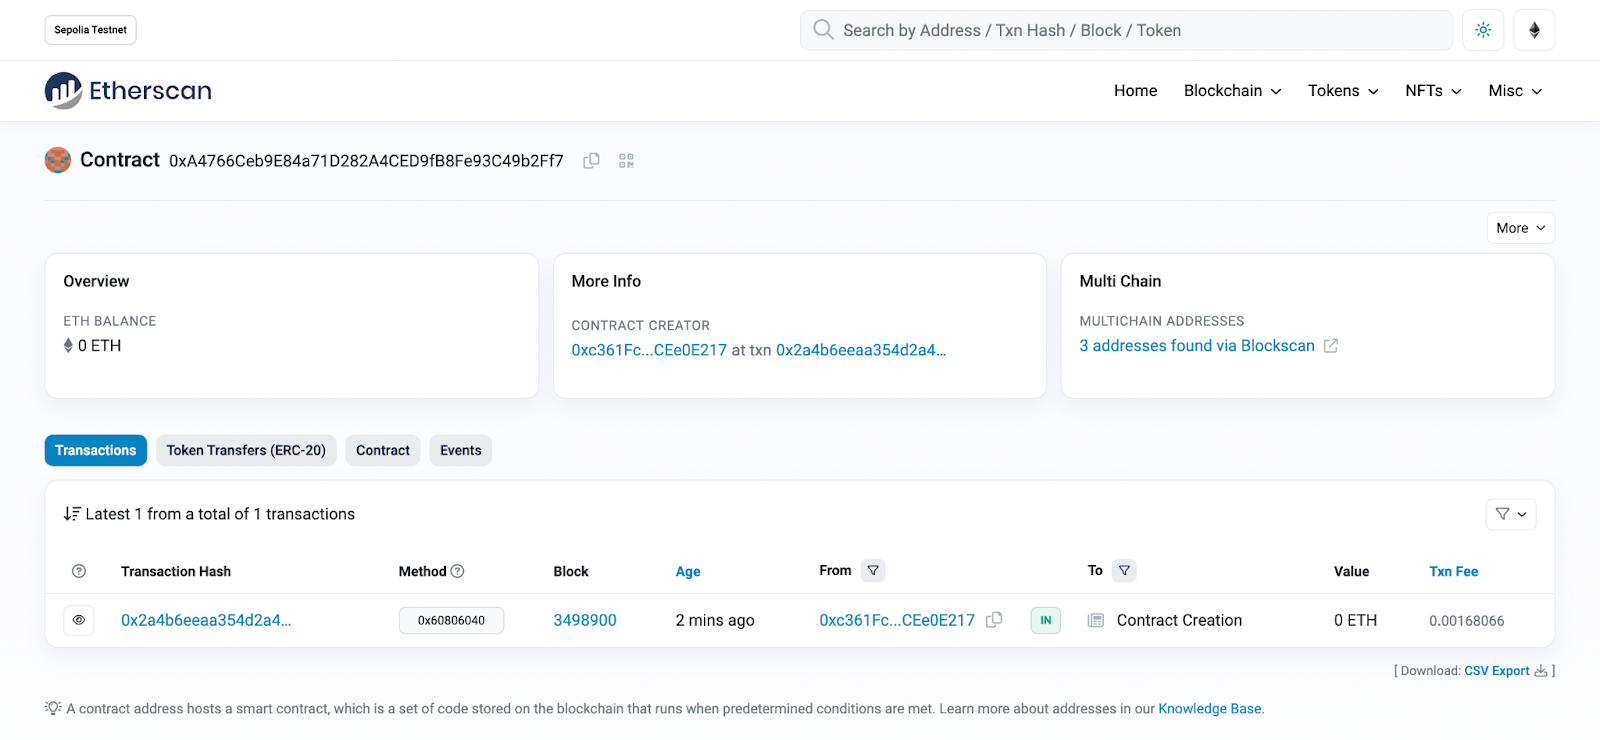
Congratulations! Your contract is now live. You can search for it on the Sepolia Etherscan.
Step 8: Create a React frontend
Now that our contract is deployed, let’s create a web3 frontend in React that will allow anyone in the world to purchase our lottery tickets.
Create a new project repository for this using the following commands:
$ npx create-react-app lottery-frontend
$ npm install ethers@5.0.13
$ cd lottery-frontend
In order for our frontend to interact with our contract, we need the contract’s ABI. Fortunately, Truffle already generated this for us when we compiled our contracts.
You can find the ABI JSON file in the build folder of your Truffle project. Create a new contracts folder in the src folder of the React project and paste the ABI file there.
Next, create a data folder in the src folder of the React project and add the following code:
const contractAddress = "<- YOUR CONTRACT ADDRESS ->";
const walletAddress = "<- YOUR WALLET ADDRESS ->";

export { contractAddress, walletAddress }
Step 9: Write the main app code
Now let’s write the main logic of the dapp. Our dapp will do the following:
- Allow users to connect their MetaMask wallet to our website.
- Allow connected users to purchase a ticket.
Even though this is a very simple app, it’s more complex (both in terms of logic and number of lines of code) than the smart contract we generated earlier.
Nevertheless, ChatGPT is still an excellent tool to use to get a “first draft” of our code. Remember that the results produced will be better if you’re more precise and detailed with your instructions—so this is exactly what we’re going to do.
We’re not going to ask it for something vague like Create a React App that interfaces with our contract. Instead, let’s use the following prompt:
ChatGPT produces a response that looks something like this:
The code that it provides, although not perfect, is a fantastic place to start.
Starting with the code that ChatGPT provided, we’ll make a few changes so that your App.js file looks something like this:
import React, { useState, useEffect } from "react";
import { ethers } from "ethers";

// Import the contract address and ABI
import { contractAddress } from "./data/constants";
import contract from "./contracts/DecentralizedLottery.json";

const contractABI = contract.abi;
const ticketPrice = "0.001";

function App() {

  const [provider, setProvider] = useState(null);
  const [contract, setContract] = useState(null);
  const [account, setAccount] = useState(null);

  useEffect(() => {
    const initialize = async () => {
      try {
        // Check if MetaMask is installed
        if (window.ethereum) {
          await window.ethereum.request({ method: "eth_requestAccounts" });
          const ethereumProvider = new ethers.providers.Web3Provider(window.ethereum);
          const selectedAccount = ethereumProvider.getSigner();

          setProvider(ethereumProvider);
          setAccount(await selectedAccount.getAddress());
          setContract(new ethers.Contract(contractAddress, contractABI, selectedAccount));
        } else {
          console.log("MetaMask is not installed");
        }
      } catch (error) {
        console.error(error);
      }
    };

    initialize();
  }, []);

  const connectWallet = async () => {
    try {
      await window.ethereum.request({ method: "eth_requestAccounts" });
      const ethereumProvider = new ethers.providers.Web3Provider(window.ethereum);
      const selectedAccount = ethereumProvider.getSigner();

      setProvider(ethereumProvider);
      setAccount(await selectedAccount.getAddress());
      setContract(new ethers.Contract(contractAddress, contractABI, selectedAccount));
    } catch (error) {
      console.error(error);
    }
  };

  const purchaseTicket = async () => {
    try {
      const transaction = await contract.purchaseTicket({ value: ethers.utils.parseEther(ticketPrice) });
      await transaction.wait();
      alert("Ticket purchased successfully!");
    } catch (error) {
      console.error(error);
      alert("Failed to purchase ticket");
    }
  };

  return (
    <div className="App">
      <h1>Decentralized Lottery</h1>
      {provider && (
        <>
          <p>Connected Account: {account}</p>
          <p>Ticket Price: {ticketPrice} ETH</p>
          <button onClick={purchaseTicket}>Purchase Ticket</button>
        </>
      )}
      {!provider && <button onClick={connectWallet}>Connect Wallet</button>}
    </div>
  );
}

export default App;
Changing fewer than 10 lines of code, we now have a full-blown dapp in our hands. We had to:
- Fix the contract address and contract ABI imports.
- Remove variables that were not being used (signer).
- Convert certain variables into constants (ticketPrice).
Let’s see this in action by running the following command:
$ npm start
This should open a browser window pointing to https://localhost:3000. If you see a Connect Wallet button, click it and connect your MetaMask. (Alternatively, you may be prompted to connect MetaMask as soon as the page loads.)
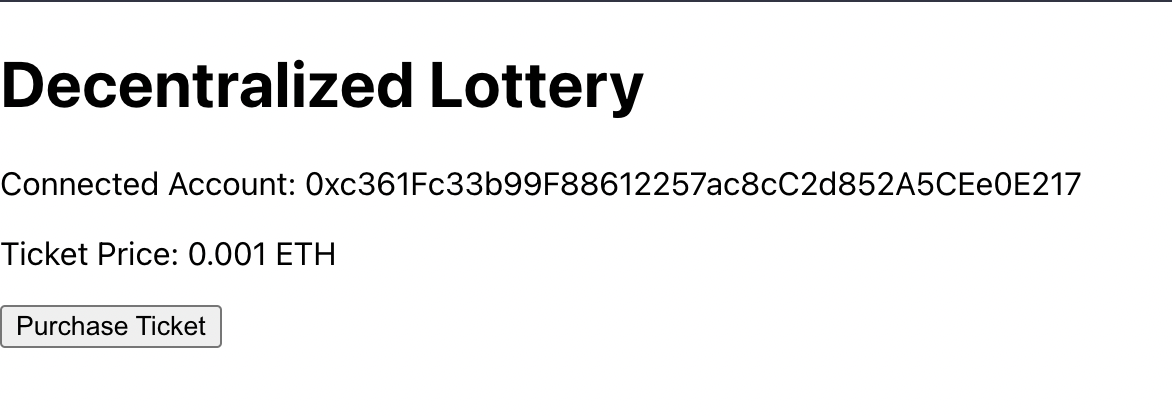
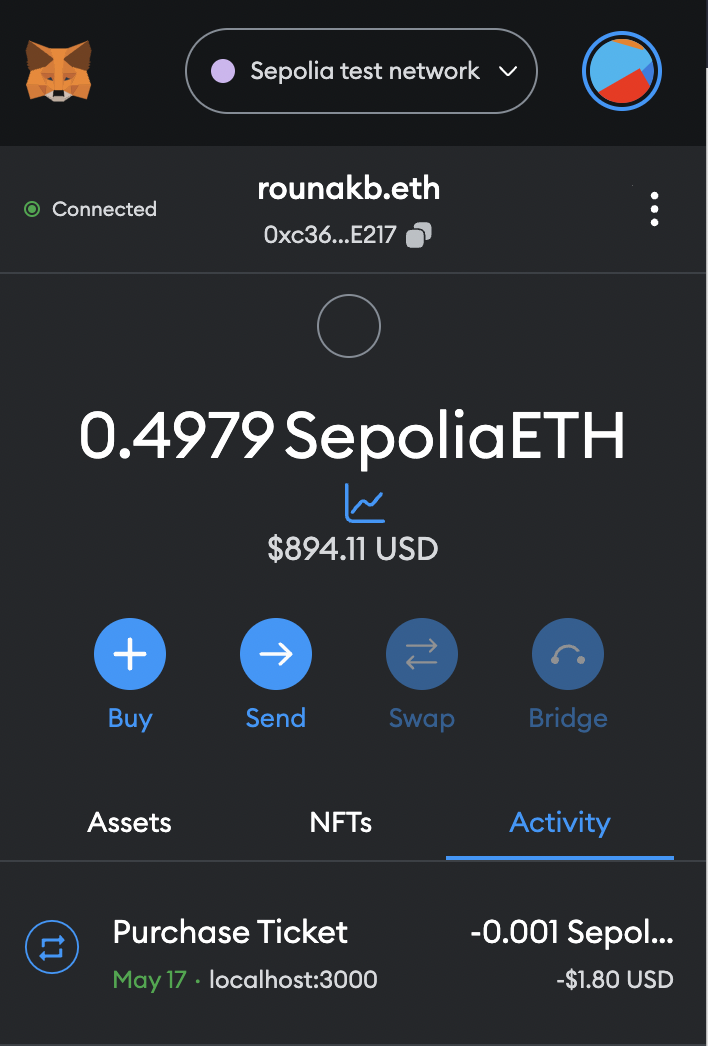
Once your wallet is connected, you should see a page that looks something like this:
Clicking on the Purchase Ticket button will prompt another MetaMask transaction, where you’ll be asked to pay the ticket price + gas.
Once you’ve done this, you should be able to check the status of your transaction on MetaMask.
Once the transaction completes, a pop-up will inform you of the same.
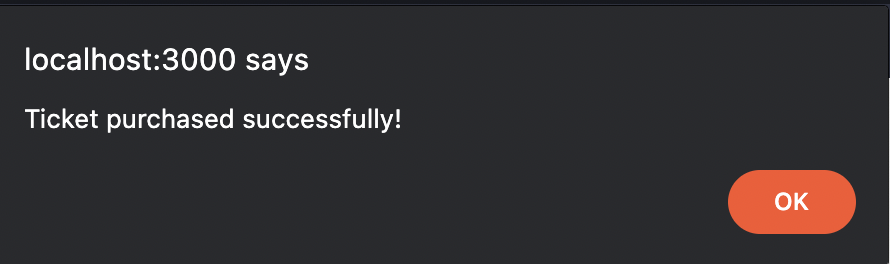
And there you have it! You’ve successfully purchased a ticket from the contract. You can verify that the transaction indeed took place by visiting your contract’s Etherscan page.

With ChatGPT generating the core app logic for you, you can now proceed to do things such as add CSS styles to your page and make it more user-friendly (for example, by giving a live status of the transaction on the page itself).
Try asking ChatGPT to do this for you instead of creating dapps from scratch. You’ll produce results faster, and your output will most likely be better than if you’d have done it yourself.
Keeping building with ChatGPT, MetaMask, and Infura
Congratulations! You’ve successfully built and deployed a lottery dapp to the Sepolia testnet. We hope this tutorial has been useful and that you understand just how ChatGPT can be a helpful assistant for your future smart contract development. To learn more about MetaMask tooling for developers, visit https://metamask.io/news/developers/.