How to Run Your Own Node AND an Infura Node
So, why would you need a hybrid infrastructure model alongside Infura? Make your infrastructure much more resilient and reliable by integrating Infura into your overall strategy.


So, why would you need a hybrid infrastructure model alongside Infura?
Let’s think about how your database is set up. You probably have your own database, which is great. What happens if that database goes down? Would your app continue to run seamlessly, delivering the experience you want your customers to get? Or, would your database shutdown cause outages and crashes in your app?
If the dataset you’re hosting is a public dataset, you have a new paradigm for making your infrastructure much more resilient and reliable by integrating Infura into your overall strategy. Infura implements a reverse proxy pattern internally and can be a highly reliable and performant node in your infrastructure stack, allowing you the ability to have a portion (or all) of your traffic routed to Infura.
You can choose to keep your database as your primary database with Infura as a backup, or vice versa. In this way, Infura will act as an always-on backup for your database, providing a level of flexibility previously not available with a single database running.
You also have the opportunity to use Infura as a stats comparison tool to make sure your performance is up to par. Alternatively, you may need to handle more load (request traffic) than your infrastructure can currently handle. You can route the overflow to an Infura project ID to handle spikes in traffic so your service stays up and running.
There are many opportunities for you to use Infura alongside your own in-house node infrastructure to improve your user experience. Let’s dive a little deeper on how we accomplish this.
What does it mean when Infura implements a reverse proxy pattern?
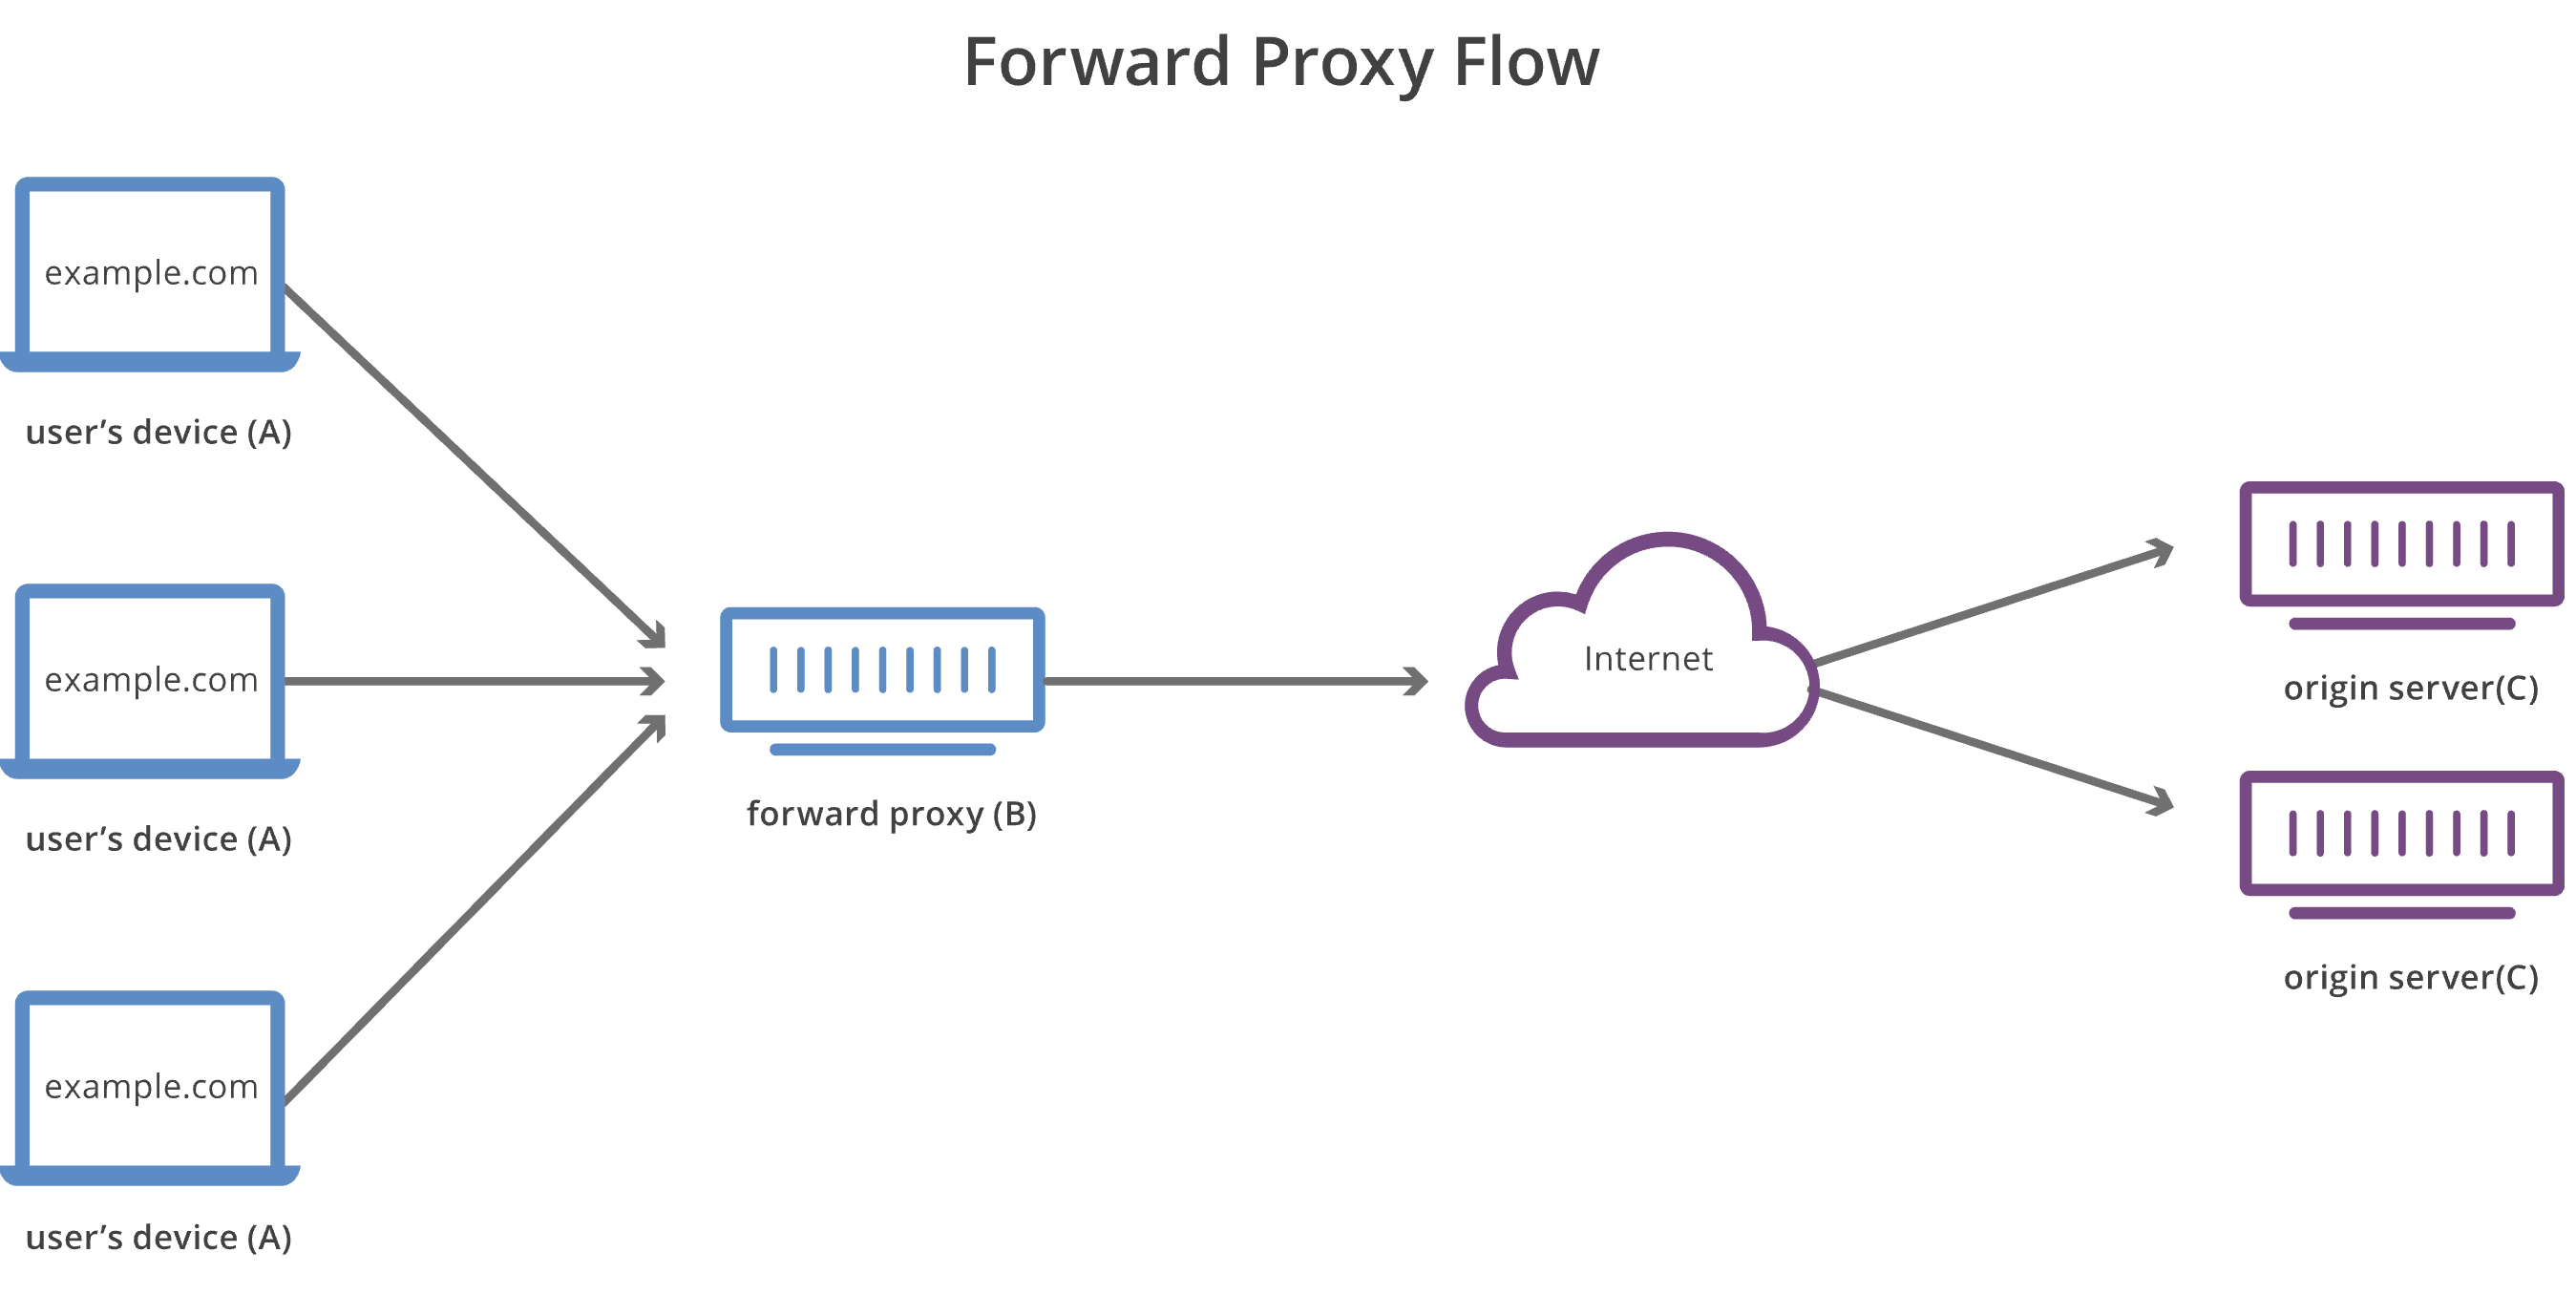
Let’s review what a normal proxy is first, and then we’ll flip it and reverse it, a la Missy Elliott, to talk about the reverse proxy. A proxy server (or web proxy or forward proxy) is a server located in front of a group of client machines (computers). When those computers make requests, the proxy server intercepts those requests and communicates with the target web servers on behalf of those clients. Basically, a proxy is a fancy word for a request/response middleman.
If you’re a visual learner, here’s a diagram from Cloudflare that shows just where that forward proxy sits:
What is a reverse proxy?
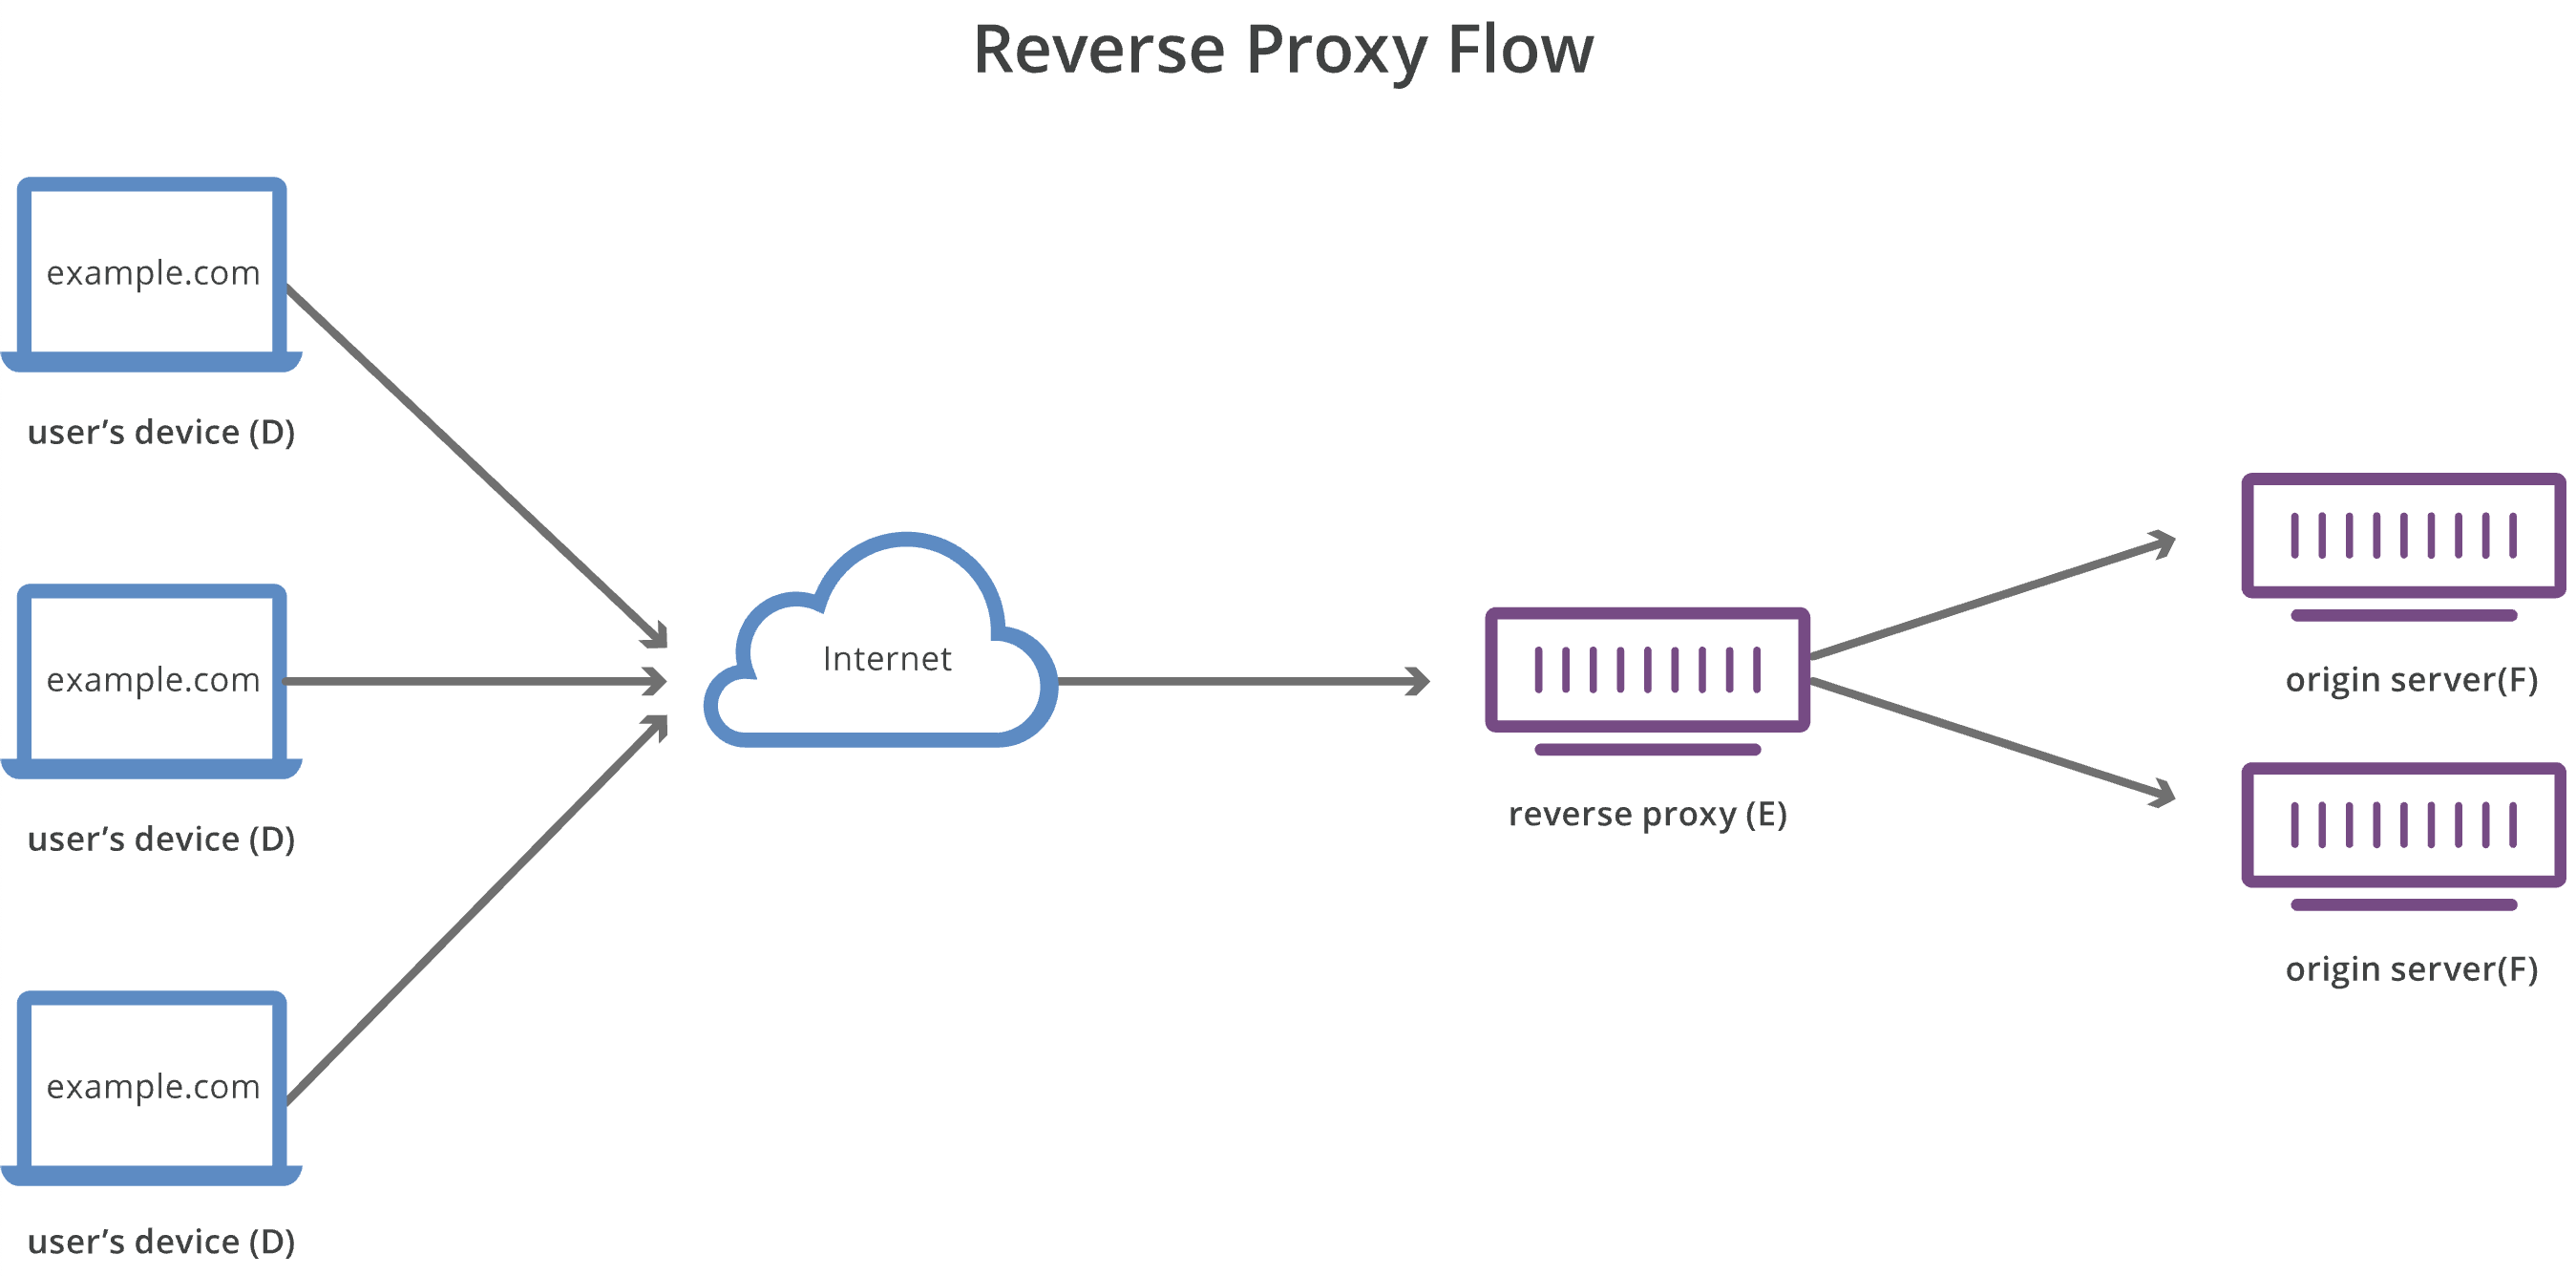
A reverse proxy is a server that typically sits on the edge of your infrastructure. It is responsible for receiving requests from web clients and subsequently routing them to one or more backend web servers.
Here’s another great diagram from Cloudflare to show how the reverse proxy fits in to the whole flow:
One of the main reasons to use a reverse proxy server is load balancing, ensuring the flow of traffic between clients and servers remains smooth. This is one of the main advantages of using both your own node and Infura. In addition, it allows you to cache content and provides web acceleration for improved performance. Lastly, reverse proxies allow for more efficient, secure SSL encryption and protection from DDoS attacks and related security issues.
As we previously mentioned, Infura can be used as a reverse proxy to assist with ensuring the flow of traffic for your clients and servers stays as smooth as possible, making for a more enjoyable user experience.
Some examples of a reverse proxy in action
Let’s first look at how we can set up a very simple reverse proxy using Caddy.
We will use our localhost and a backend HTTP service running on 127.0.0.1:9000 to make sure we’re getting our reverse proxy working correctly.
First, download Caddy. Once that’s downloaded, check out their Getting Started guide here. Or, follow along to learn how to set up a simple reverse proxy!
At this point, you may be running your own node, but since it takes too long to sync one for this article, we can substitute with a simple NodeJS stub to check that our reverse proxy is working correctly. I simply named mine main.js.
const http = require('http');

const hostname = '127.0.0.1';
const port = 9000;

const server = http.createServer((req, res) => {
   res.statusCode = 200;
   res.setHeader('Content-Type', 'text/plain');
   res.end('Reverse proxy success!\n');
});

server.listen(port, hostname, () => {
   console.log(`Server running at http://${hostname}:${port}/`);
});
This sets up a backend HTTP service running on 127.0.0.1:9000 mentioned earlier and will display a “Reverse proxy success!” message if our proxy is working correctly. To start this, run `node main.js` in a different terminal window and leave that connection open!
Next, we will want to create a Caddyfile (literally create a new text file in whatever directory you’re working in and name it Caddyfile). Once you have that set up, we will set up our simple reverse proxy itself inside the Caddyfile with just two lines:
localhost

reverse_proxy 127.0.0.1:9000
In this instance, reverse_proxy is where we want to get our information from (the original site), and localhost is where we are redirecting to using our reverse proxy.
Now, from the same directory as your Caddyfile in a new terminal window from your `node main.js`, run:
caddy run
This will start the caddy server and will allow your reverse proxy to work! Now, you’ll notice when you run this that you don’t see the “Reverse proxy success!” message popping up.
That’s because this just started the server. You now need to make a request to “https://localhost” and you’ll see the message. To do this, open another terminal window (that makes three now, for those of us keeping track), and simply run:
curl https://localhost
Running this command will give you the “Reverse proxy success!” message we were looking for, and now you know you’ve successfully set up a simple reverse proxy.
Enter Infura!
Now that we’ve gotten a basic reverse proxy up and running, let’s try one using an Infura endpoint. We will keep our overall setup of using a Caddyfile the same, but we won’t need the backend HTTP service running in the background, as that will be switched to an Infura endpoint.
We’re going to change up how our Caddyfile looks:
localhost

reverse_proxy https://rinkeby.infura.io {
   header_up Host {/v3/<YOUR_PROJECT_ID>}
}
You will notice that we’ve added in a “header_up Host” inside the reverse_proxy section. This allows us to include our Project ID to both the Rinkeby endpoint and the localhost endpoint we are proxying to.
To test this out, we will need to send a request, so I used web3_clientVersion as an example:
curl https://localhost/v3/<YOUR_PROJECT_ID> \
-X POST \
-H "Content-Type: application/json" \
-d '{"jsonrpc":"2.0","method":"web3_clientVersion","params": [],"id":1}'
When we run this, we get the following output:
{"jsonrpc":"2.0","id":1,"result":"Geth/v1.10.8-omnibus-aef5bfb3/linux-amd64/go1.16.7"}
Cool! But how do I know my reverse proxy is working? Well, if you switch out `localhost` in our curl command to `rinkeby.infura.io`, you get the same output, which shows that our reverse proxy is running properly.
How do you use Infura as a backup for your own node?
We’re going to set things up initially the same as we did in the previous example but with two upstreams, one to our localhost and the other to the Infura node.
Next, we’re going to set up load balancing. Now, what’s load balancing? Load balancing acts like a traffic cop sitting in front of your application servers, routing client requests across all the servers that can fulfill those requests quickly and efficiently.
So how do we set that up?
Since we’re using Caddy, we can refer to their docs for the basics of how to use more than one upstream. When we look at lb_policy, there are many ways to determine which upstream Caddy will use first. Caddy will default to using the first listed upstream and will move down the list if the servers stop responding. In our example, we want to have localhost:9000 from our main.js file be the first upstream, meaning we want our reverse proxy to send the data through our localhost first, so we will identify that by putting it first in our list of upstreams (we will leave our Infura Rinkeby endpoint in as the second upstream):
localhost

reverse_proxy localhost:9000 https://rinkeby.infura.io {
   header_up Host {/v3/66172ed429624788ac264604755ba42c}
}
Since we are using the localhost:9000 port, we want to get that server back up and running. In another terminal window, start the Node server with node main.js.
To make sure everything is set up correctly, let’s run our request through by running the same request from earlier but with the :9000 port included, expecting to get the “Reverse proxy success!” message:
curl http://localhost:3000/v3/<YOUR_PROJECT_ID> \
-X POST \
-H "Content-Type: application/json" \
-d '{"jsonrpc":"2.0","method":"web3_clientVersion","params": [],"id":1}'
and we get the following output:
Reverse proxy success!
Excellent! Now, how do we incorporate the Infura endpoint to be a fallback?
You’ll notice we left the Infura endpoint in our Caddyfile where it originally stood and we asked our proxy to load balance using the first upstream (our localhost), which was how we got that “Reverse proxy success!” message.
Now that we confirmed that we set everything up correctly on our end, we’re going to kill the localhost server, mimicking what would happen if your private node went down. Once we do that, our requests should automatically start routing to the Infura node and we should get something similar to the below output:
{"jsonrpc":"2.0","id":1,"result":"Geth/v1.10.8-omnibus-aef5bfb3/linux-amd64/go1.16.7"}* Closing connection 0
But wait! We don’t get that! Instead, we get an error message.
This is because Caddy only allows us to use either two HTTP or two HTTPS endpoints - in our case, localhost is HTTP and our Infura endpoint is HTTPS.
Luckily, there is a tool we can use to make this work with localhost that will create a TLS certificate and sign it with a CA trusted locally by your device and browser. That tool is called mkcert, and it’s incredibly easy to install by following these steps.
Keep in mind if you’re doing this with your own private HTTPS node, you likely will not need this additional step.
If you are following our tutorial step-by-step (using localhost), be sure to follow all the steps, including updating your main.js file to the below to include the HTTPS requirement and the options constant.
const https = require('https');
const fs = require('fs')
const options = {
   key: fs.readFileSync('<PATH_TO_CERTIFICATE-KEY_FILE>.pem'),
   cert: fs.readFileSync('<PATH_TO_CERTIFICATE_FILE>.pem')
};

const hostname = '127.0.0.1';
const port = 9000;

const server = https.createServer(options, function(req, res) {
   res.statusCode = 200;
   res.setHeader('Content-Type', 'text/plain');
   setTimeout(() => {res.end('Reverse proxy success!\n');}, 1000)
});

server.listen(port, hostname, () => {
   console.log(`Server running at https://${hostname}:${port}/`);
});
When you run the mkcert localhost command from the tutorial, the certificate key file and certificate file used in the code above will be created.
Now that we have our localhost running with HTTPS, we can continue! Since we are running everything with HTTPS, we need to update our Caddyfile to reflect those changes.
localhost:3000

reverse_proxy https://localhost:9000 https://rinkeby.infura.io {
   header_up Host {/v3/66172ed429624788ac264604755ba42c}
}
Now that we have all our files in order, let’s make sure our Node.js server is running and send that request again.
curl http://localhost:3000/v3/<YOUR_PROJECT_ID> \
-X POST \
-H "Content-Type: application/json" \
-d '{"jsonrpc":"2.0","method":"web3_clientVersion","params": [],"id":1}'
What do we get?
Reverse proxy success!
Perfect! That’s exactly what we want to get, as we have asked our reverse proxy to go to https://localhost:9000 first.
Now, what happens if we kill the Node server and send our request again? Remember last time we did this, we got an error message. This time we should be getting the result from our Infura Rinkeby node:
{"jsonrpc":"2.0","id":1,"result":"Geth/v1.10.8-omnibus-aef5bfb3/linux-amd64/go1.16.7"}
Success!
Our reverse proxy is, in essence, ignoring the localhost node, as it’s not functioning, and is defaulting to the Infura Rinkeby node!
Super easy, right? Now you know how to use Infura as a backup node to keep your services up and running smoothly!
Where can I learn more about reverse proxies?
Take a look at our client story from MakerDAO. They currently use Infura for a multitude of reasons, including using us as a backup node solution to ensure all developers can use the MakerDAO toolkit!
Another great example is the Polygon PoS network. We initially began working with Polygon to share some traffic load for their network, allowing users to access the Polygon networks via Infura endpoints and effectively ensuring their network remains fast and functional, regardless of traffic spikes they may see. We have since increased our partnership so we are now handling 100% of their network traffic.
Check out this blog post highlighting multiple companies across all verticals using a hybrid infrastructure model of their own nodes plus Infura. Get some ideas on how we can help you accomplish your needs, from verifying transactions to providing backup database services!
If you would like to run an Infura node in addition to your own, sign up for a free trial today.