How to create an NFT with Infura
Here are all the steps you need to create an NFT with Infura.


Here are all the steps you need to create an NFT with Infura.
Are you curious about NFTs and want to create your own? Infura is a powerful tool that makes it easy to create and manage NFTs on Ethereum and other blockchains. In this tutorial, we'll show you how to mint your own NFT using Infura, step-by-step.
I'll explain NFTs and what it means to mint an NFT. I'll also provide a high-level overview of how Infura works and what you need to get started.
By the end of this guide, you'll have a solid understanding of what it takes to create an NFT and how Infura can help you do it quickly and easily, by allowing you to focus on the core application logic while taking care of your node needs.
What are NFTs?
Non-Fungible Tokens (NFTs) are unique digital assets that represent ownership of a specific item, such as a piece of artwork, music, or content. NFTs differ from regular tokens as they are non-fungible and cannot be exchanged for an identical item or value.
Each NFT is one-of-a-kind and has a distinct value determined by supply and demand. Additionally, NFTs are often stored on blockchain technologies like Ethereum or Polygon, providing a secure and transparent way to verify ownership and authenticity of the digital asset.
What does it mean to ‘mint’ an NFT?
To "mint" an NFT simply means to create a new and unique NFT on a blockchain network. It is the process of assigning a token ownership to an address, with some metadata that describes the token.
This process typically starts with creating and deploying an ERC721 or ERC1155 smart contract that contains the specific details of the NFT, such as its name and symbol.
Followed by creating and uploading the NFT assets - images, music or content, and metadata to the hosting service of your choice - more on this later.
Then lastly calling the mint function from your deployed contract with the recipient’s address and the NFT metadata URI provided by a hosting service.
For hosting assets and metadata for NFT projects, there are three options to choose from:
- Centralized hosting services like AWS - are not censorship resistant.
- On-chain storage - is too expensive
- Decentralized storage like InterPlanetary File System (IPFS) - is the best bet since it is not as expensive as on-chain storage but decentralized enough to be censorship resistant.
Where does Infura come in when creating NFTs?
Whether it is to deploy an NFT smart contract on Ethereum, Polygon, or Arbitrium, or host NFT assets and metadata on IPFS, you’ll need a connection to these networks by operating complex and expensive server software (nodes) that are error-prone and time-consuming.
Infura solves these problems by providing a set of robust and easy-to-use APIs for developers to start building quickly without having to worry about operating and maintaining blockchain nodes.
As of today, Infura supports 11 networks including Ethereum, IPFS, Filecoin, Polygon, Arbitrum, Avalanche, Optimism, Celo, Near, Aurora, and StarkNet.
Now that we’ve gotten the bulk of the theories out of the way, let's jump right in and start minting NFTs!
Requirements for creating an NFT
To be able to follow through with the content of this tutorial, you will need to have the following requirements:
- Node.js installed. It is advisable to install node.js using NVM.
- Truffle installed.
- A free Infura account.
- A MetaMask wallet.
- A code editor - VS Code preferably.
- Some Goerli testnet ETH.
How to write an NFT smart contract
To start, we’ll need a Truffle project to house the NFT smart contracts. Truffle makes it easy to build, compile and deploy smart contracts to predefined networks. In our case, we’ll deploy and mint our NFT on the Goerli testnet and in the next section, we’ll set up Truffle to do that.
truffle init infura-nft-project
cd infura-nft-project
truffle create contract InfuraNFTProject
Your project structure should look like this:
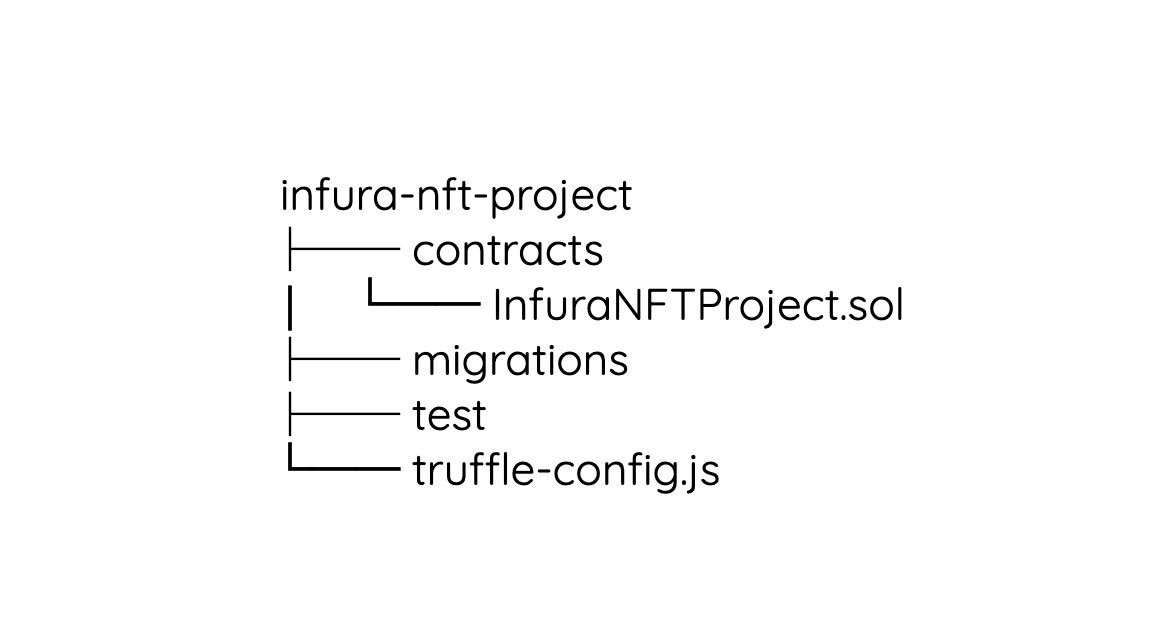
To quickly develop the smart contract for this project, we’ll use OpenZeppelin’s contracts wizard, an interactive generator for smart contracts based on OpenZeppelin’s implementations.
I will check a couple of boxes and have the wizard generate the contract for me, which I can then copy into InfuraNFTProject.sol and compile.

// InfuraNFTProject.sol file
// SPDX-License-Identifier: MIT
pragma solidity ^0.8.9;
import "@openzeppelin/contracts/token/ERC721/ERC721.sol";
import "@openzeppelin/contracts/token/ERC721/extensions/ERC721URIStorage.sol";
import "@openzeppelin/contracts/access/Ownable.sol";
import "@openzeppelin/contracts/utils/Counters.sol";

contract InfuraNFTProject is ERC721, ERC721URIStorage, Ownable {
    using Counters for Counters.Counter;
    Counters.Counter private _tokenIdCounter;

    constructor() ERC721("InfuraNFTProject", "INP") {}

    function safeMint(address to, string memory uri) public onlyOwner {
    uint256 tokenId = _tokenIdCounter.current();
    _tokenIdCounter.increment();
    _safeMint(to, tokenId);
    _setTokenURI(tokenId, uri);
    }

    // The following functions are overrides required by Solidity.

    function _burn(uint256 tokenId) internal override(ERC721,     ERC721URIStorage) {
    super._burn(tokenId);
    }

    function tokenURI(uint256 tokenId)
    public
    view
    override(ERC721, ERC721URIStorage)
    returns (string memory)
    {
    return super.tokenURI(tokenId);
    }
}
To compile this contract successfully, we’ll have to make sure the dependencies listed at the beginning of the file are installed correctly.
Go ahead and install OpenZeppelin’s contract library with this command npm install -dev @openzeppelin/contracts.
Now compile the contracts with truffle compile, you should get a response that looks like the image below along with a new build folder.

Deploy your NFT smart contract to the Goerli public testnet
With the smart contract compiled successfully, the next step is to deploy it to a public network so that we can mint the NFT and see it in our MetaMask mobile wallet.
The first step to deploying any contract to the blockchain using Truffle is to create a deployment script, also known as a migration file. In the migrations folder, create a new file 1_deploy_contracts.js and add the following content to it.
// 1_deploy_contracts.js
const InfuraNFTProject = artifacts.require("InfuraNFTProject");

module.exports = function (deployer) {
    deployer.deploy(InfuraNFTProject);
};
The second step is to access the blockchain network you wish to deploy your NFT to. To help us with access to a public network like Goerli, we will use Infura. With a tool like Infura, we won’t have to set up and maintain our own node on the network we chose to deploy to, that is a lot of work.
Infura saves us time and energy by setting up and maintaining these nodes on our behalf, for a variety of networks including Goerli, providing an endpoint with which we can access the public blockchain.
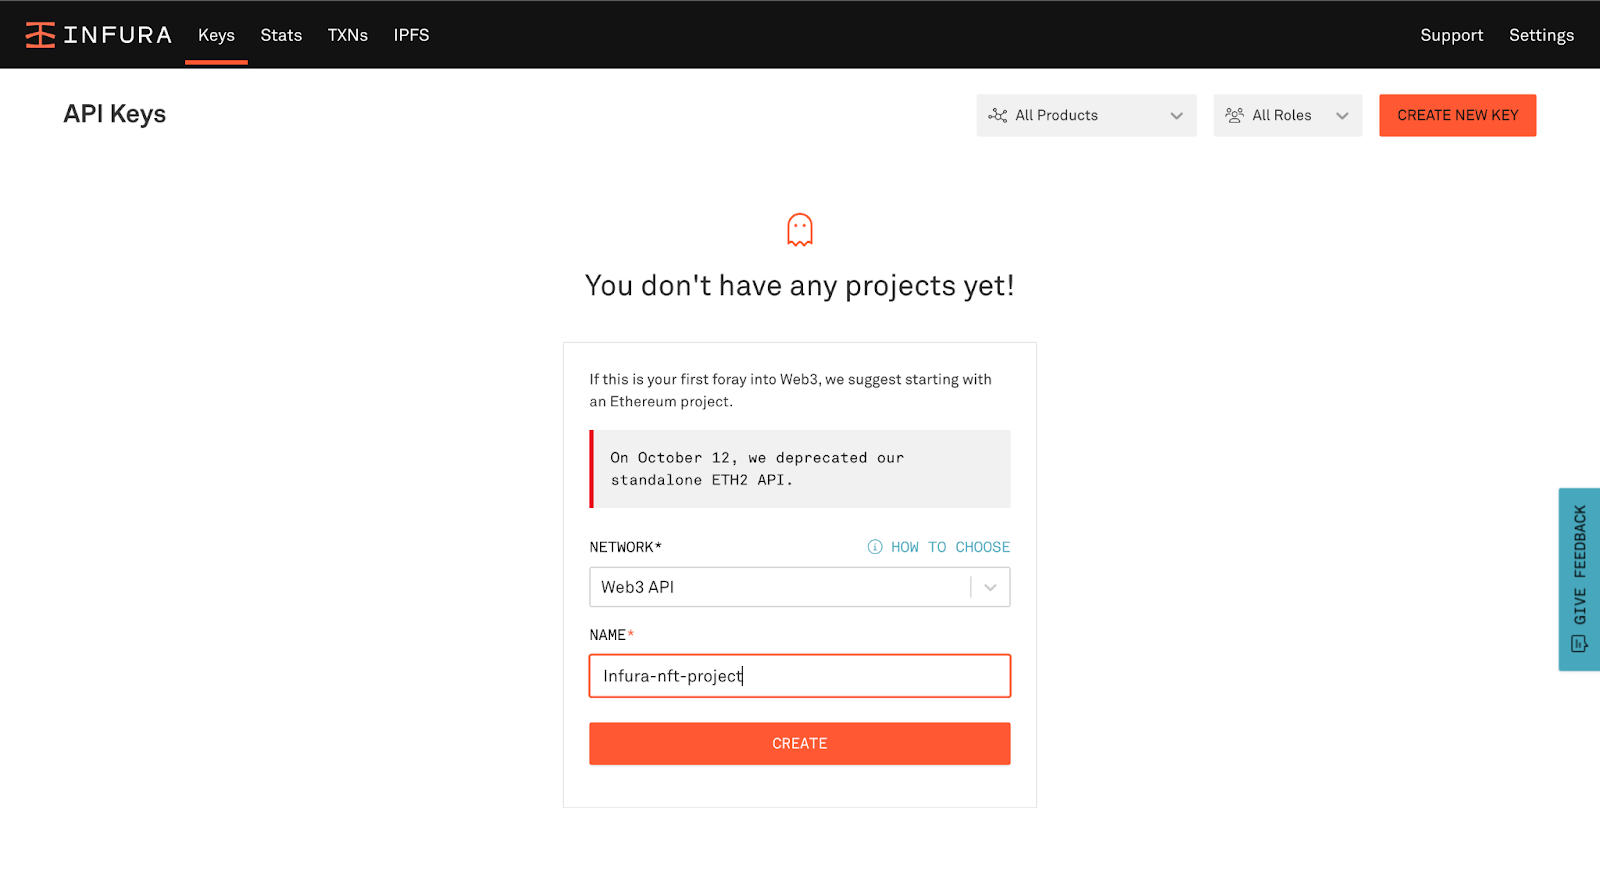
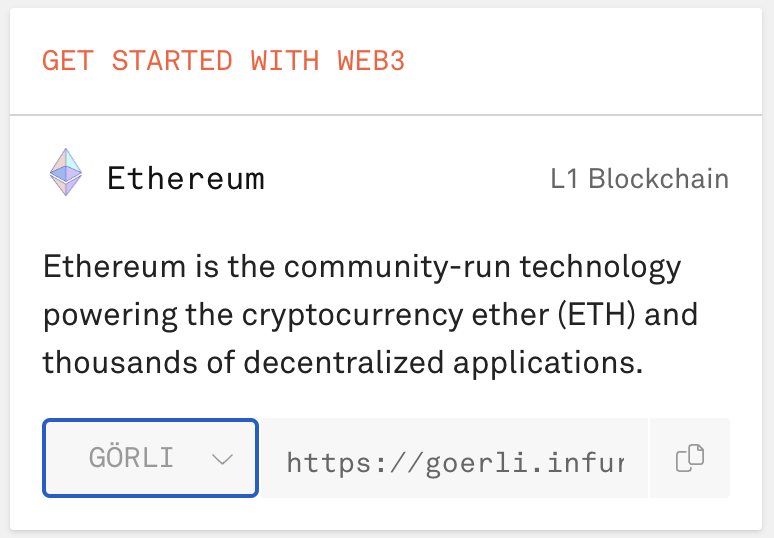
Head to the infura dashboard and create a new project under Web3API and retrieve your project keys. On the Ethereum card, select Goerli to expose your unique Goerli project endpoint.
To successfully deploy the smart contract to the Goerli network using Infura’s API through Truffle, we’ll need to set up a provider that will sign transactions on our behalf.
One way to do this is to obtain your mnemonic seed phrase from your MetaMask wallet and hand it over to Truffle. An alternative and easier way to do this would be to use the Truffle dashboard which would route transactions to your MetaMask wallet when needed, preventing the need to expose your private keys.
Since the goal of this tutorial is to get into the details and show how things work under the hood, we’ll use the first approach as it also allows us the ability to monitor transactions via the Infura project dashboard.
Head to your MetaMask wallet and click on the profile icon in the top right-hand corner -> Click settings -> Security & Privacy -> Reveal Secret Recovery Phrase -> Enter your password and copy out your secret recovery phrase.
On the root of your Truffle project, create a .env file and add the following content to it. Please ensure this file isn’t tracked by a version control as committing this file to a version control can cause significant damage.
IMPORTANT: Add .env to .gitignore if you use GIT version control.
// .env file
“MNEMONIC="YOUR METAMASK SECRET RECOVERY PHRASE"
“INFURA_API_KEY="YOUR INFURA_API_KEY"
Now that we have these keys ready, let’s update the truffle-config.js file and configure Goerli network as our network of choice.
// truffle-config.js file
require("dotenv").config();
const { MNEMONIC, INFURA_API_KEY } = process.env;

const HDWalletProvider = require("@truffle/hdwallet-provider");

module.exports = {
  networks: {
    goerli: {
      provider: () =>
        new HDWalletProvider(
          MNEMONIC,
          `https://goerli.infura.io/v3/${INFURA_API_KEY}`
        ),
      network_id: 5, // Goerli's network id
      chain_id: 5, // Goerli's chain id
      gas: 5500000, // Gas limit used for deploys.
      confirmations: 2, // # of confirmations to wait between deployments. (default: 0)
      timeoutBlocks: 200, // # of blocks before a deployment times out  (minimum/default: 50)
      skipDryRun: true, // Skip dry run before migrations? (default: false for public nets)
    },
  },

  // Set default mocha options here, use special reporters, etc.
  mocha: {
    // timeout: 100000
  },

  // Configure your compilers
  compilers: {
    solc: {
      version: "0.8.17", // Fetch exact version from solc-bin (default: truffle's version)
    },
  },
};
For this to work, we’ll need to download the dotenv and @truffle/hdwallet-provider dependencies referenced in the configuration file. Run this command to get those installed “npm install -dev dotenv @truffle/hdwallet-provider”.
Now that all is set, we can deploy the smart contract to the Goerli network with this simple command: “truffle migrate --network goerli”.
If you’ve done everything correctly and you have enough goerli ETH in your MetaMask wallet, you should get a response like the one shown below:
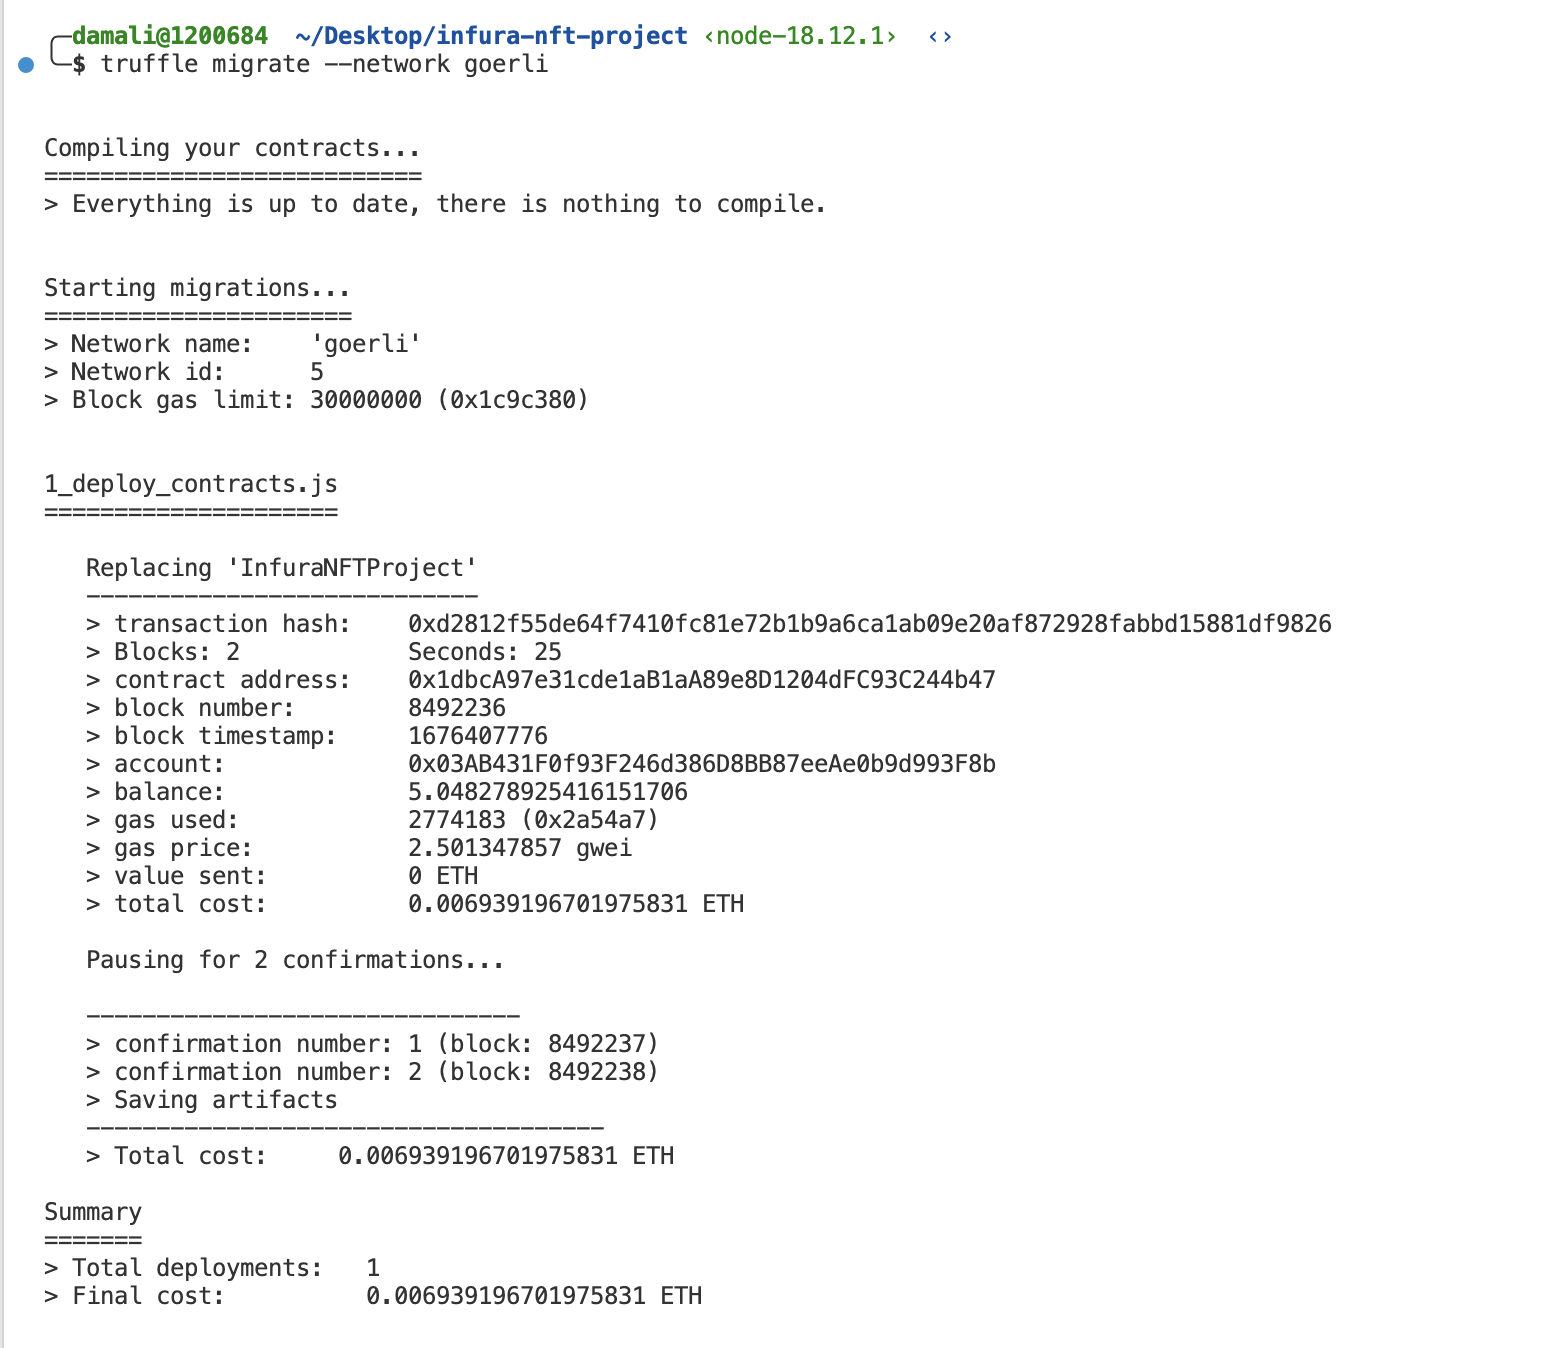
If you search Etherscan for the contract address, you should be able to see your contract. Great work!

Upload NFT assets and metadata to IPFS through Infura
Another place Infura makes our lives easier is by providing access to IPFS through the Infura dashboard. Head to the Infura dashboard and create an IPFS project.
To be able to assess IPFS content through Infura, you need to enable a dedicated gateway, follow this simple guide on creating a dedicated gateway to get up to speed.

The next step is to upload the NFT image files to IPFS. Grab your IPFS Project ID and Secret Key and navigate to the root directory containing your NFT image.
Run the following command, replacing “InfuraNFT.jpg” with your image name and <API-Key>:<API-Key-Secret> with your Project ID and Secret Key respectively.
curl "https://ipfs.infura.io:5001/api/v0/add" \
-X POST \
-F file=@"InfuraNFT.jpg" \
-u "<API-Key>:<API-Key-Secret>"
You should get a response that looks like this:
{"Name":"meme-nft.jpeg","Hash":"QmW5sPVbZDueZwvSuibteAwDFwFXhF8gebfptGBx1DZq1j","Size":"78353"}
Copy the image hash from the response and store it somewhere as we’ll be using it for the next step.
Next is to create and upload a JSON file describing the NFT image we just uploaded, we’ll follow the Opensea standard to ensure that we’re able to see our NFT on Opensea once minted.
Copy over the following content to a JSON file, replacing “<DEDICATED GATEWAY SUBDOMAIN>/ipfs/<NFT IMAGE HASH>" with the dedicated gateway subdomain you enabled earlier and the image hash you copied above.
// InfuraNFT.json
{
    "name": "Infura NFT",
    "description": "How to mint an NFT with Infura tutorial",
    "image":   "<DEDICATED GATEWAY SUBDOMAIN>/ipfs/<NFT IMAGE HASH>", // e.g  "https://infura-nfts.infura-ipfs.io/ipfs/QmRmUJiwcKSp2Tq5MdNvkkuQFktbeEgJHwfv9SbYX6uhGk"
    "attributes": [
    { "trait_type": "content", "value": "tutorial"},
    { "trait_type": "product", "value": "Infura"},
    { "trait_type": "author", "value": "Kingsley"}
    ]
}
To upload this JSON file to IPFS, in your command line, navigate to the root of the directory containing the JSON file and run the following command:
curl "https://ipfs.infura.io:5001/api/v0/add" \
-X POST \
-F file=@"InfuraNFT.json" \
-u "<API-Key>:<API-Key-Secret>"
Remember to replace the file name, API-key, and API-Key-Secret with your filename, Project ID and Secret Key respectively. See this guide for more information on how to upload images and metadata to IPFS using the IPFS API method.
If you’ve done those correctly, you should have two pinned items in your Infura IPFS dashboard.

Calling the mint function on the NFT smart contract
With the NFT contract deployed and the image asset and metadata uploaded to IPFS, we’re ready to call the mint function and assign this NFT to an Ethereum address.
To help us achieve this, we will use the Truffle console. Head to the root of your project directory containing the truffle-config.js and .env files and run the following commands to connect the Truffle console to the Goerli network we defined in our truffle-config.json file.
source .env
truffle console --network goerli
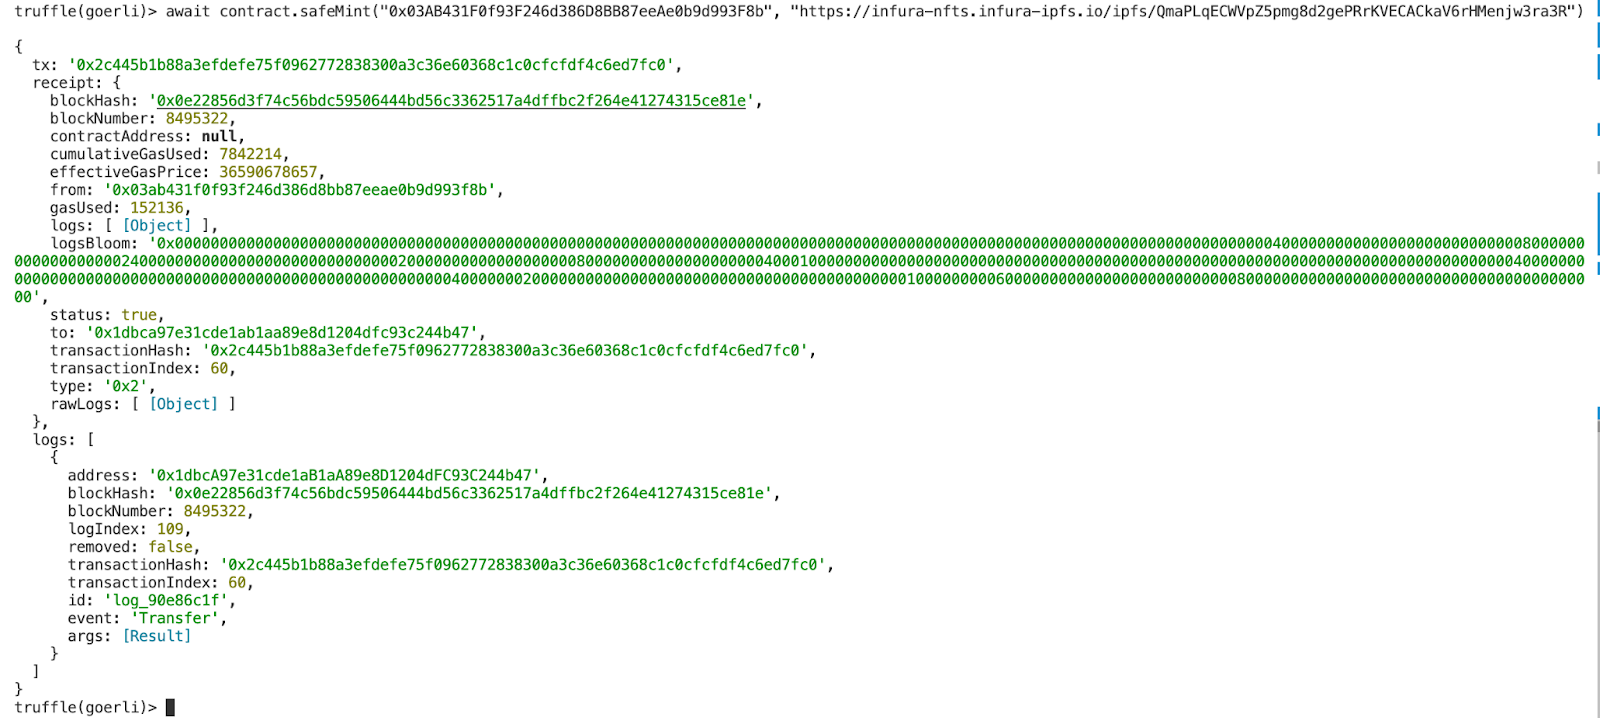
In the console that opens up, grab the deployed NFT contract and call the mint function, replacing the recipient’s address and metadata URI with your Ethereum address and the URI to the metadata you uploaded on IPFS.
const contract = await InfuraNFTProject.deployed()
await contract.safeMint("<RECIPIENT’S ADDRESS>", "<DEDICATED GATEWAY SUBDOMAIN>/ipfs/<NFT METADATA FILE HASH>")
You should get a response that looks like this:
Now if you head to your MetaMask mobile wallet, you should see your newly minted NFT under the NFT tab. Make sure you’re on the Goerli network. You can also head to https://testnets.opensea.io/ and connect your wallet to see your NFT on Opensea.
Conclusion: now you know how to create an NFT
That’s it! You’ve written and deployed an ERC 721 token, uploaded an NFT image and metadata to IPFS using Infura’s APIs and you’ve invoked the mint function on your NFT contract to assign this NFT to a recipient’s address using the Truffle console.
You can see how relying on Infura can greatly improve your productivity by allowing you to focus on your app, while Infura manages your nodes and provides you with a robust dashboard to track and monitor requests in real-time.