Getting Started With Infura
Infura provides developers and enterprises with simple, reliable access to web3 tools and infrastructure. The Ethereum and IPFS API suite serves and supports thousands of decentralized applications every day.


Blockchain development can be complex. And no wonder—when working within a decentralized system operating on a set of complex protocols there are many factors you need to consider. Even for even the simplest of activities, you need to access blockchain nodes, check gas prices, pay for gas, sign transactions, and more.
Infura is a powerful suite of APIs and developer tools that abstracts away these complexities on the most popular blockchains, including Ethereum, Linea, Arbitrum, StarkNet, IPFS, and more. By using Infura, you can spend more time building your dapp, and less time worrying about details such as scalability and uptime.
This guide provides all the steps necessary to set up and get started using Infura. You’ll be able to set up an Infura API key, access the Ethereum (Sepolia) blockchain, and use Infura to build your dapp. By the end of this guide, you’ll see why leading dapps and tools such as MetaMask, Uniswap, and MakerDAO rely on the reliability, ease of use, and scale of Infura to power their ventures.
Prerequisites
To get started, you’ll need a one-time setup of some tools and software essential to creating and deploying your dapp.
Set up MetaMask
First, in order to conduct transactions on a blockchain (for example, deploying a contract or minting an NFT), you’ll need a crypto wallet.
Several options for wallets are available in the market, but we’ll use the most popular and easy to use, MetaMask. MetaMask is a self-custodial wallet that gives users full control over their crypto and transaction authorizations. MetaMask is available for free as a browser extension.
Once you install the extension, MetaMask will ask you to complete a series of simple steps to set up a wallet for you. In the process, you’ll receive a secret phrase for accessing and managing your wallet. Make sure you store this secret phase safely (ideally both in a digital and physical space), and never share this publicly. If someone learns your secret phrase, they can then steal the assets in your wallet. We recommend creating a separate wallet address for development purposes, where your valuable assets wont be stored.
Switch to the Sepolia test network
Once your wallet is set up, navigate to the top-right of the wallet window and click on Show/Hide Test Networks. After showing test networks, you’ll see the drop-down option for Sepolia. Switch your network from Ethereum mainnet to Sepolia test network.

If this is your first time using a wallet, you should see a balance of 0 SepoliaETH. We’ll fund this wallet in a later step.
Node.js and npm
We’ll use Hardhat to create the foundation of your project but feel free to use any other development environment you're comfortable with.
To use Hardhat, you need to first install Node.js and npm. You can install both on your local machine by following these instructions.
You can verify their successful installations using the command line. (Your version numbers might be different from what’s shown below.)
Step #1: Obtain an Infura API key
As mentioned earlier, Infura is a tool that gives you easy, fast, and reliable access to most major public blockchains and L2s, including Ethereum. Infura does this by giving you access to RPC endpoints. Think of RPC endpoints as API endpoints to which you can send requests. In order to access these endpoints, you’ll need an Infura API key.
Create an account
To get an API key, you’ll first need to sign up for an Infura account that is free. Once you’ve signed up, you’ll be taken to the dashboard. This dashboard allows you to complete a variety of tasks, such as:
- Create new API Keys
- View analytics
- Access support and other helpful resources
- Setup project security
- Upgrade your plan and activate add-on networks
- Get network endpoints for mainnet and testnets
- And more
Create API key
From the dashboard, click Create New API Key. This will open a pop-up form. For network, choose Web3 API. You can name the project anything you want.

Once you click Create, Infura will create a new API key for you and redirect you to the key’s dashboard page. Navigate to the Endpoints page for your key. project.

On this page, you’ll see all the RPC endpoints that you can access. Under Ethereum endpoints, select the endpoint for Sepolia. The endpoint should be of the format https://sepolia.infura.io/v3/[YOUR API KEY].

After this step, we recommend that you add your own RPC endpoint to MetaMask by adding a new customer network. This will allow you to track your MetaMask requests directly from the Infura dashboard and understand what is happening in the backend when you send transactions from your MetaMask wallet.
Step #2: Set up your development environment
With a MetaMask wallet and an Infura RPC endpoint in hand, you can begin setting up your development environment using Hardhat.
Initialize a Node.js project
First, let’s set up a Node project and install all necessary packages. Create an empty Node repository by running the following commands:
$ mkdir infura-project && cd infura-project
$ npm init -y
Next, install Hardhat:
$ npm install --save-dev hardhatRemember that we installed MetaMask so that we could pay for transactions conducted on the blockchain. You’ll need to give Hardhat access to your wallet so it can perform that action on your behalf. This means that you’ll be sharing your wallet secret phrase with your Hardhat project.
Under no circumstance should these secrets ever be made public. You should never hard-code your secret phrase or credentials into your project. Instead, provide them through environment variables.
We’ll use dotenv and gitignore to do this. This prevents your secret phrase from being committed to version control systems and reduces the risk of accidental exposure when sharing code repositories like GitHub. Go ahead and install these packages with the following commands:
$ npm install dotenv
$ touch .env
touch .gitignore
Next, add “.env” to your .gitignore file to make sure GitHub doesn’t include the file containing your keys publicly.
.envInitialize a Hardhat project
Now, we can initialize a barebone Hardhat project by running the following command from within your Node.js project root folder and follow the prompt:
$ npx hardhat initTo ensure that everything works correctly, you should see a hardhat.config.js file on the root of your Node.js project.
In your project, you should now see a contracts subfolder. Within this folder, let’s create an extremely simple smart contract in a file called Donations.sol. This contract does the following:
- Allow anyone to donate.
- Allow the owner of the contract to withdraw all the donations made.
The code for Donations.sol should look like this:
// SPDX-License-Identifier: MIT
pragma solidity ^0.8.0;

contract Donations {
  address public owner;

  constructor() {
    owner = msg.sender;
  }

  // Function to donate
  function donate() public payable {
    require(msg.value > 0, "Donation needs to be a positive value");
  }

  // Withdraw ether
  function withdraw() public payable {
    require(msg.sender == owner, "Only the owner can withdraw!");

    uint balance = address(this).balance;
    require(balance > 0, "No ether left to withdraw");

    (bool success, ) = (msg.sender).call{value: balance}("");
    require(success, "Transfer failed.");
  }
}
Compile the contract with the following command:
$ npx hardhat compile

Compiling...
Compiled 1 contract successfully
Configure Hardhat and environment variables
Next, we’ll need a file to store our environment variables. This is where we’ll put your project secrets—namely, your MetaMask wallet secret phrase and the Sepolia RPC endpoint which contains your Infura API key.
In the .env file located in the root of your Node.js project, add the following variables:
INFURA_ENDPOINT = "https://sepolia.infura.io/v3/<Your-API-Key>"
MNEMONIC = "<Your-MetaMask-Secret-Recovery-Phrase>"
Next, let’s inject this information and configure your Hardhat project to use it. Replace the contents of hardhat.config.js with the following:
require('dotenv').config();
const { INFURA_ENDPOINT, MNEMONIC } = process.env;

module.exports = {
  // ...rest of your config...
  networks: {
    sepolia: {
      url: `https://sepolia.infura.io/v3/${INFURA_API_KEY}`,
      accounts: [SEPOLIA_PRIVATE_KEY],
    },
  },
};
Step #3: Deploy your smart contract to Sepolia
Now that we’ve configured our Hardhat project and written the smart contract, we can deploy it to the Sepolia blockchain.
Use the Infura faucet to get some test SepoliaETH
Although we’ve set up your MetaMask wallet and configured it to use the Sepolia network, your wallet balance is still 0 SepoliaETH. In order to conduct any transactions—such as deploying your contract, making donations, and even retrieving donations—you’ll be required to pay gas. So, you’ll need some SepoliaETH in your wallet.
Since we’re deploying our contract to a test network (Sepolia), you can obtain these tokens for free through the Infura Sepolia faucet.
Once you’ve filled up your wallet, you should see a small SepoliaETH balance.

Deploy your smart contract to Sepolia
To deploy your contract to Sepolia, we’ll write a script. Navigate to the scripts folder, create a new file deploy.js, and paste in the following code:
const hre = require("hardhat");

async function main() {
  const donations = await hre.ethers.deployContract("Donations");
  await donations.waitForDeployment();

  console.log("Donations contract deployed at:", donations.address);
}

main().catch((error) => {
  console.error(error);
  process.exitCode = 1;
});
Then, deploy the smart contract with the following command:
$ npx hardhat run scripts/deploy.js --network sepoliaCongratulations! Your contract is now live! You can double-check this by searching for your contract address on Sepolia Etherscan.

You can also verify your contract on Etherscan by uploading the source code, which Etherscan will match and compare against the code on the blockchain. On the Etherscan page, click the Contract tab and then click Verify and Publish.

After this verification is complete, you’ll see the green check mark over the Contract tab.

Step #4: Send a transaction using MetaMask
Now let’s donate a small amount (0.001 ETH) to this contract. Navigate to the Contract tab and then to the Write Contract tab. Click on Connect to Web3.

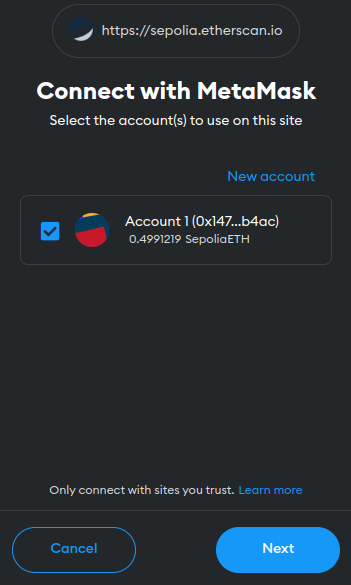
This will open a modal to prompt you to connect to a wallet. Select your MetaMask wallet.
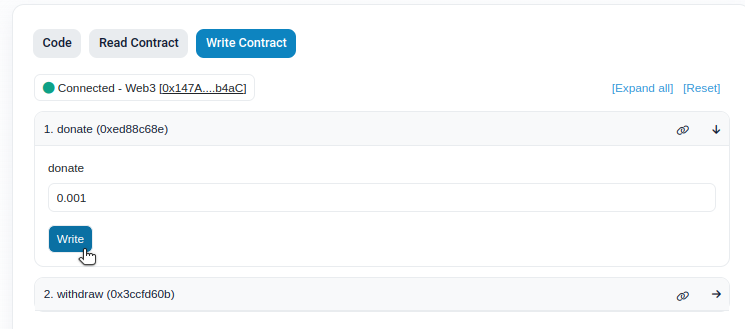
Once your wallet is connected, you can click donate. Enter an amount to donate (0.001), and then click Write.
Your MetaMask wallet will pop up, and you’ll be asked to confirm this transaction. Click Confirm.

After you’ve confirmed the transaction, you can view the transaction details. The list of transactions for the smart contract also shows the recent transaction.

And that’s it! With just a few clicks, you were able to make a donation through MetaMask on your smart contract. Every single step in the process was powered by Infura.
Step #5: Track smart contract activity on the Infura dashboard
To see the work done by Infura under the hood, you can check out the analytics associated with our Infura project. Navigate to the main Infura dashboard, find your project, and click View Stats.

If this is a project that you’ve just created, change the timeline to Last 1 Hour.

You will be able to see the number of requests made during that window.

You should also be able to see the specific requests made to the Sepolia Ethereum blockchain. On the surface, you’ve only made a few clicks, but hundreds of requests have been propagated to make what we wanted to do possible.

To also see your MetaMask transactions, you will need to update your MetaMask RPC endpoint by switching from the default MetaMask RPC to your Infura one.
Step #6: Start building
Infura simplifies your job as a blockchain developer by allowing you to connect to different blockchain networks without having to run your own nodes. This takes care of the scalability, uptime, and the reliability of your dapp so you can focus on the core logic of your business or product.
Now that you’re set up, let’s start building with the following resources:
- How to Choose the Right Blockchain for your Application
- The Developer’s Guide to the Web3 Stack
- Full Stack Frontend using IPFS
- Infura NFT API + SDK
- Infura Help Center
- Infura Discord
Stay up to update on all Infura product releases and news by following us on Twitter.