Ethereum JavaScript Libraries: web3.js vs. ethers.js (Part II)
In this tutorial, we will walk you through a simple dApp to demonstrate how to send a transaction using both web3.js and ethers.js via Infura’s APIs.

Web3.js and ethers.js are JavaScript libraries that allow developers to interact with the Ethereum blockchain. In part I of our tutorial series on Ethereum JavaScript libraries, we compared web3.js and ethers.js, focusing on their similarities and differences, so that you could better understand the nuances of the libraries and evaluate which library better fits your particular use case.
In this part of the tutorial, we will walk you through building a simple dApp to demonstrate how to send a transaction using both web3.js and ethers.js via Infura’s APIs.
Prerequisite: This tutorial assumes comfort with writing a smart contract in Solidity. If that does not apply to you, no worries! A more in-depth walkthrough on how to set up your developer tools and deploy a sample smart contract can be found in the ConsenSys developer portal.
Before we dive in, let’s cover why we would want to use Infura! For developers or teams who require scalable infrastructure on-demand, they can use Infura to connect their dapps to Ethereum testnets and mainnet with a single line of code. This saves teams from having to host and maintain their own Ethereum nodes which is both expensive and complicated. Teams can then focus exclusively on core product development rather than maintaining costly infrastructure.
Starting our Project: Part 1
*Note: If you already have a project set up, skip down to “Section 2: Web3.” Otherwise, we will quickly cover how to spin up a project using Infura + Truffle and connect that to React where we will interact with and compare Web3 and Ethers)
Section 1: Truffle
Our tutorial will be using Truffle to spin up the foundation of our project. Truffle is a development environment that enables us to connect with the Ethereum Virtual Machine and interact with our smart contracts. Truffle makes development of smart contracts on Ethereum easier by offering compilation, deployment, testing, and debugging tools. When combined with Ganache, it allows developers to test interactions locally prior to targeting public networks such as Rinkeby or Mainnet.
Let’s start by initializing Truffle in the command line
~$ truffle initOnce we’ve run the command, have a look at what was injected into our project.We now have the building blocks cooked in for us to start working on our project. For this tutorial we are going to be focusing on contracts, migrations, and the truffle-config files.

Next, you’ll want to add the Truffle HD Wallet provider to your newly initialized project, so that you can sign your transactions before they are sent to the Infura nodes.
To add our wallet provide within our project let’s go ahead and run
~$ npm install --save @truffle/hdwallet-providerNow we will need to install Ganache!
~$ npm install -g ganache-cliGanache is a personal Ethereum blockchain which you can use to run tests, execute commands, and inspect state while controlling how the chain operates. It’s useful throughout the entirety of the development cycle.
Think of this as your localhost:XXXX: everything that occurs remains local, which provides an excellent playground before we utilize Infura and deploy to a testnet in this tutorial.
In order to access the truffle console (which we dive into in just a moment) we need to make sure we have our truffle-config development updated. Otherwise the following error will occur.
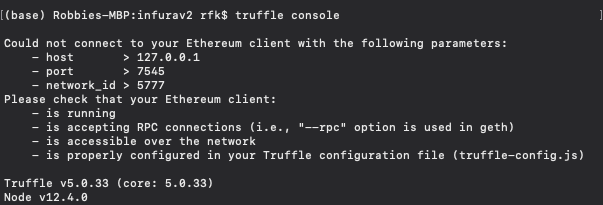
If you would rather use the GUI version (opposed to the CLI), you can download it here from Truffle.
The results after selecting quick-start within the GUI should look similar to this
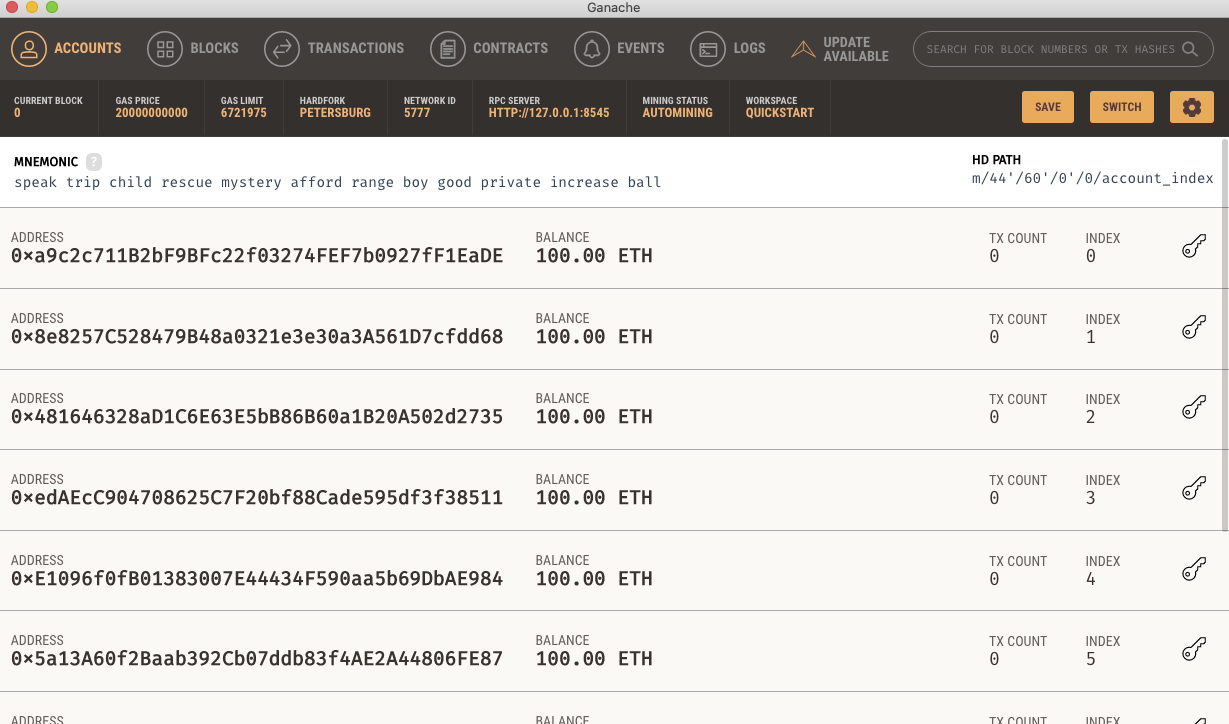
We will now configure our truffle-config.js file to resemble the image below so we can connect to our local Ganache testnet. If you’re unfamiliar with this file, it is a Javascript file and can execute any code necessary to create your configuration. It must export an object representing your project configuration like the example below.
development: {
      host: "127.0.0.1", // Localhost (default: none)
      port: 8545, // Standard Ethereum port (default: none)
      network_id: "*" // Any network (default: none)
    },
Once we have our truffle-config adjusted, we should now go ahead and run (in a separate tab of our terminal)
~$ ganache-cliWith ganache installed we should now see it in our terminal. To test that our Ganache testnet connection is working, let’s try:
~$ truffle consoleWe will now need to make some adjustments to our hdwallet-provider we’ve installed. Just to touch on this subject, hdwallet-provider is a convenient and easy-to-configure network connection to Ethereum through Infura.
In the console run:
~$ const HDWalletProvider = require('@truffle/hdwallet-provider');(HDWalletProvider will return undefined)
Next add in your mnemonic:
~$ const mnemonic = '12 words here';(mnemonic will return undefined)
Then we will add our wallet:
~$ const wallet = new HDWalletProvider(mnemonic, "http://localhost:8545");So now when we run wallet, we can see a list of accounts / addresses we can use.
~$ walletHave a look! You’ve created a wallet you can use in your terminal. You should see something like this.
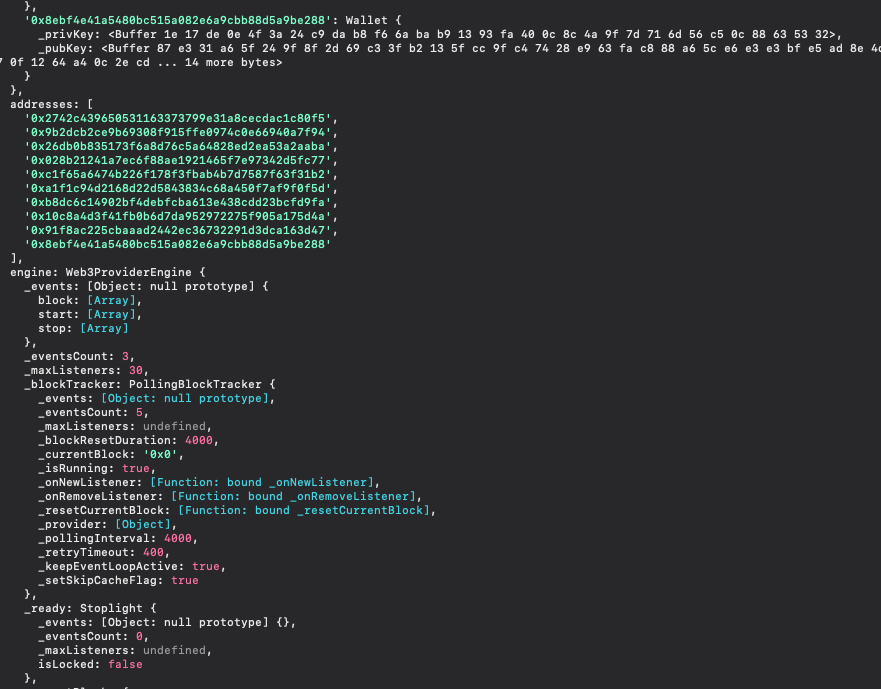
Let’s now move on to setting up our connection using a testnet (in this case we will be using Rinkeby). We will be using Infura to deploy our contract to the testnet so we can start to build out a front end and interact with our Storage contract!
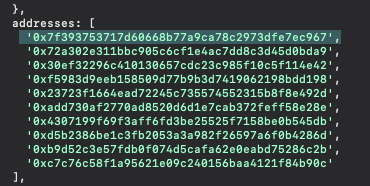
*Important note: The address we will make sure has a balance as we get test ETH from Rinkeby in the next section will also be used to deploy our contract. This will be the first address provided in the array.
See below for example, note that your provided address will not match these, but you will grab from the same positioning.
Section 2: Rinkeby
Next we will make sure we can send transactions on Rinkeby, which requires a wallet with Rinkeby ETH. We already have a wallet so now let’s head over to a popular faucet such as this one. Faucets send testnet ETH to a specified account in order to assist developers in their testing.
Once we follow the instructions in the link and obtain some Rinkeby test ETH, the specific address from our wallet (see image above) should reflect our new balance and we are good to move on to setting up Infura!
You can check your balance by heading over to rinkeby.etherscan.io and add your address and see for yourself!
Section 3: Infura
When using Infura, the first thing we will want to do is register for an account. You can start for free with just a username and password!
After you’re signed up, we will create a project in the dashboard, which should look like this:
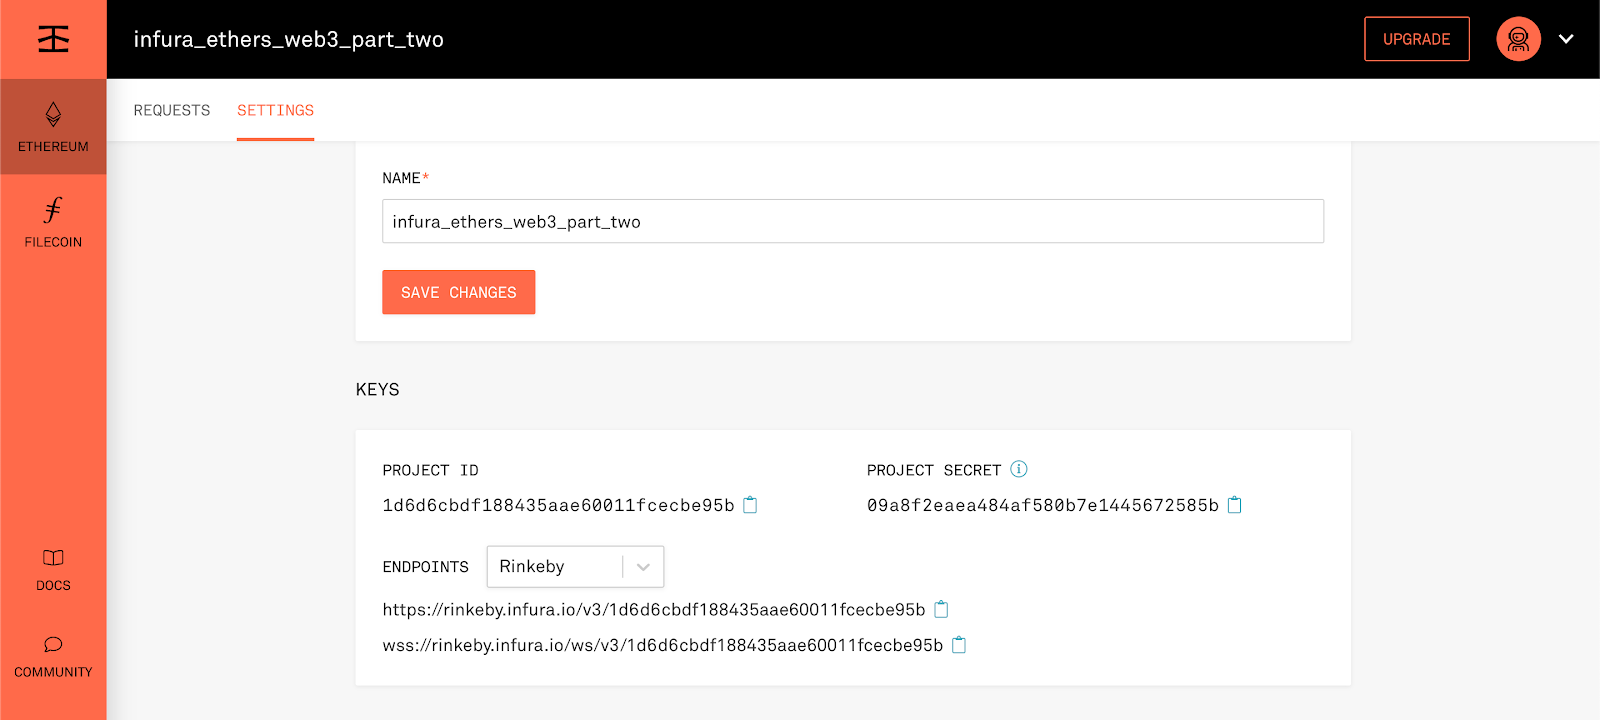
The project ID is what we will use to authenticate our API requests to Infura. Make sure to select Rinkeby in the Endpoints drop down since that is the network we will be using.
Make sure you’re no longer in the truffle console!
In our project let’s install:
~$ npm install --save dotenvThis will allow us to access our sensitive information in our truffle-config file as we continue to build it out without having to directly add our project-id from infura or our mnemonic.
After that installation, we will want to create a .env file, which will contain our sensitive information. Remember: this information should not be pushed and made publicly viewable. We will include our Infura project ID (generated when we created our Infura account), and our mnemonic phrase. Have a look at this article for a deeper dive on the importance of keeping secrets!
PLEASE MAKE SURE TO NOT UPLOAD YOUR SENSITIVE INFORMATION
To make sure we can add our Infura project ID and our mnemonic:
Our .env file should resemble this (with your information added)
INFURA_PROJECT_ID=INSERT YOUR PROJECT ID HERE (no quotations)
MNEMONIC="your mnemonic here"
Then we will head over to our truffle-config once more and get everything connected using Infura! This will give us the ability to point our application at the Rinkeby Infura infrastructure.
We will now add access to our HDWallet Provider we previously installed, along with require("dotenv").config(); to access the sensitive information from our .env file. We will place this new information at the top of our truffle-config file.
*Note: If you are using Infura endpoints, the `from` parameter is required, as Infura doesn't allow wallet creation via our APIs in order to protect our users' security. If you are using Ganache or Geth RPC endpoints, this is an optional parameter.
Our updated code should look like this:
require("dotenv").config();
const HDWalletProvider = require("@truffle/hdwallet-provider");

module.exports = {
 networks: {
   development: {
     host: "127.0.0.1", // Localhost (default: none)
     port: 8545, // Standard Ethereum port (default: none)
     network_id: "*", // Any network (default: none)
   },

   rinkeby: {
     provider: () =>
       new HDWalletProvider(
         process.env.MNEMONIC,
         `https://rinkeby.infura.io/v3/${process.env.INFURA_PROJECT_ID}`
       ),
     network_id: 4, // Rinkeby's id
     gas: 5500000, // Rinkeby has a lower block limit than mainnet
     confirmations: 2, // # of confs to wait between deployments. (default: 0)
     timeoutBlocks: 200, // # of blocks before a deployment times out  (minimum/default: 50)
     skipDryRun: true, // Skip dry run before migrations? (default: false for public nets )
   },
 },
};
If you have a look at the image above we are declaring Rinkeby to be the network we connect to, pulling in our HDwallet, mnemonic, and Infura project ID.
Now that we have our configuration complete in order to deploy a contract to Rinkeby using Infura, let’s go ahead and write in our contract!
Section 4: Contract
Let’s add a tried-and-true contract to our project.
This contract will allow a user to enter a UINT (unsigned positive integer) which we can observe in the set() function. Then have the ability to return / view the UINT, which is done by calling the get() function.
We will create a new .sol file within our contract folder and add the following contract named SimpleStorage.sol
pragma solidity >=0.5.8 <0.7.0;

contract SimpleStorage {
    uint256 storedData;

    function set(uint x) public {
        storedData = x;
    }

    function get() public view returns (uint) {
        return storedData;
    }
}
Let’s also update our migrations to be aware of our newly created contract.
(We dive into migrations deeper in the developer portal). If you’re unfamiliar, migrations are Javascript files that allow you to deploy your contracts to the Ethereum network. Compiled contracts are referred to as artifacts. When we migrate our project, the migration scripts need access to the artifacts.We will make a new file named 2_deployed_contracts.js within the Migration folder and add the following:
const SimpleStorage = artifacts.require("SimpleStorage.sol");

module.exports = function(deployer) {
 deployer.deploy(SimpleStorage);
};
We now have given the migration scripts access to the compiled smart contract.
Section 5: Deploy
In our terminal let’s now run:
~$ truffle compile*Note: Keep an eye on this process completing! We should now see in our file structure a new folder called build, which contains two JSON files.
(These are our artifacts we will refer to when building out our front end.)
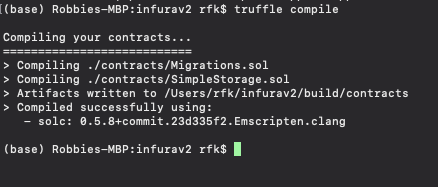
And after a successful compile let’s now run:
~$ truffle migrate --network rinkebyWe have just successfully deployed a contract to the Rinkeby testnet using Infura!
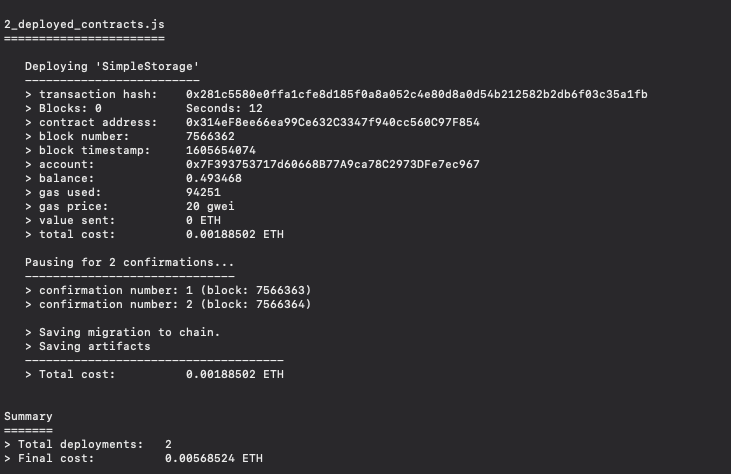
You can grab the contract address (see image above) head back over to rinkeby.etherscan.io, add the address and have a look at the details. Check for it here.
*Note: If you are running into issues with insufficient funds, be sure to send some Rinkeby ETH to the account that you are using to deploy the contract. Please see Section 2: Rinkeby above.
Setting up our Application: Part 2
Section 1: React
We can take all of the work we have done to this point and make sure it lives in a single folder. In other words, our build / contracts / migrations / test / env / truffle-config all live under one roof.
Now that we have our contract deployed, let’s get our front end going. We will start by using npx to create a boilerplate react application. Fun fact! Node package manager (npm) is a tool that is used to install packages. Npx is a tool that is used to execute packages.
~$ npx create-react-app infura_experimentsLet’s make sure to take the work from earlier (contracts + migrations + truffle-config file) and add that directory to our React project on the same level as our Source folder (referred to as src from here on) so all of our work can live together.
Section 2: Web3
Web3.js is a collection of libraries that allow you to interact with a local or remote Ethereum node using HTTP, IPC or WebSocket. It has been in heavy usage for some time (as mentioned in Part 1), so let’s just dive into the usage.
~$ npm install web3Then in your src folder, the app.js file is where you’ll want to make sure you import Web3
import Web3 from "web3";*Note: The Web3 class is a wrapper to house all Ethereum related modules.
Details on this can be found here.
We will start by making sure we have a provider! The web3js library requires a Provider object that includes the connection protocol of the node you're going to connect to.
import React, { useState } from "react";
import Web3 from "web3";
import "./App.css";

const web3 = new Web3(Web3.givenProvider);
Within our src, go ahead and make a new folder namedABI, along with an abi.js file within that folder. We will head over to our SimpleStorage.json (within the build folder) and grab the ABI information.
We should see something like this in the JSON.
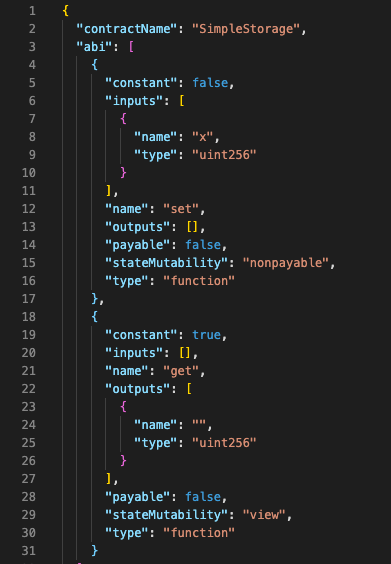
What our abi/abi.js should look like
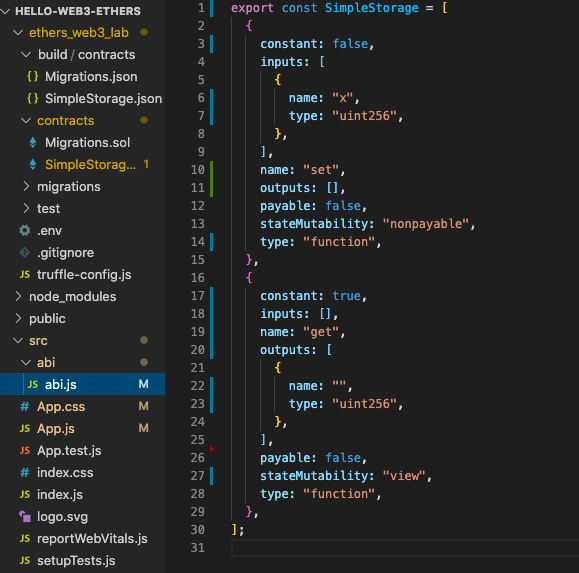
Code available below
export const SimpleStorage = [
 {
   constant: false,
   inputs: [
     {
       name: "x",
       type: "uint256",
     },
   ],
   name: "set",
   outputs: [],
   payable: false,
   stateMutability: "nonpayable",
   type: "function",
 },
 {
   constant: true,
   inputs: [],
   name: "get",
   outputs: [
     {
       name: "",
       type: "uint256",
     },
   ],
   payable: false,
   stateMutability: "view",
   type: "function",
 },
];
Next, we will grab our deployed contract address.
On the chance you get a little lost here, you can head over to your SimpleStorage.json file (located within the build directory) and search for “address”. See below:

const contractAddress = "your contract address here";Then we will add the following under our contractAddress
const storageContract = new web3.eth.Contract(SimpleStorage, contractAddress);Our new variable named “storageContract” which will contain both our contract address (so our app knows where the contract is which we declare in the line above), and the ABI (so our app knows how to interact with the contract).
We will add our import of SimpleStorage which contains our ABI information, along with setting up the foundation to interact with our contract.
So now our project should look like this (see image below).
import React, { useState } from "react";
import "./App.css";
import { SimpleStorage } from "./abi/abi";
import Web3 from "web3";

const web3 = new Web3(Web3.givenProvider);
const contractAddress = "your contract address here";
const storageContract = new web3.eth.Contract(SimpleStorage, contractAddress);
Section 3: Logic
Next we can add some functionality to our application using Web3. This will allow a user to make reference to the functions within our smart contract (SET) (GET) and trigger our MetaMask wallet when updating the state (our UINT), along with having the ability to retrieve said update.
We will use hooks to hold variables that will interact with our contract and front end. We will do this by declaring the following within our app function. Have a look here if you want to read more on hooks.
 const [number, setUint] = useState(0);
 const [getNumber, setGet] = useState("your uint is...");
Next we have to consider the fact that our dApp will need permission to access the user’s funds to pay for gas fees when sending transactions. Transactions are required to invoke functions inside of a smart contract.
This is where our connection to MetaMask comes in handy to sign the transaction that sets our uint inside the contract and pay the gas fee required to mine the transaction (again don’t worry this is on the testnet!).
const accounts = await window.ethereum.enable();Will request a user’s permission to access their wallet.
const account = accounts[0];Will grab the current user's address
const accounts = await window.ethereum.enable();
const account = accounts[0];
Next we pass the functions parameters via methods.set() and with our declared address (users address), we then handle the Set function.
 const gas = await storageContract.methods.set(number).estimateGas();
   const post = await storageContract.methods.set(number).send({
     from: account,
     gas,
   });
We are making reference to number (see below)
const [number, setUint] = useState(0);In terms of our numberGet it’s more straight forward
const post = await storageContract.methods.get().call();
   setGet(post);
 };
We retrieve and store our uint from our numberSet. This occurs due to the stored number from our hook implementation setGet(post). You can read more about how this works here.
So far our dApp should look like this.
function App() {
 const [number, setUint] = useState(0);
 const [getNumber, setGet] = useState("your uint is...");

 const numberSet = async (t) => {
   t.preventDefault();
   const accounts = await window.ethereum.enable();
   const account = accounts[0];
   const gas = await storageContract.methods.set(number).estimateGas();
   const post = await storageContract.methods.set(number).send({
     from: account,
     gas,
   });
 };

 const numberGet = async (t) => {
   t.preventDefault();
   const post = await storageContract.methods.get().call();
   setGet(post);
 };
The web3.eth.Contract object makes it easy to interact with smart contracts on Ethereum. When you create a new contract object, you give it the JSON interface of the deployed smart contract and Web3 will auto-convert all calls into low-level ABI calls over RPC for you.
This allows you to interact with smart contracts as if they were JavaScript objects.
Remember, every time we refer to storageContract, we are basing it off the usage of web3.eth.Contract since we can interact with them as you see above when we set in POST and GET in numberGet. These functions we are referencing are found in our ABI, take a look for yourself.
const post is going to take the uint and confirm the transaction (post paying gas fee) from your MetaMask wallet on the Rinkeby network.
We create our smart contract transaction by passing in our function parameters to the smart contract methods.set(), and estimated gas and user account address to .send().
With our logic handled, let’s make a basic return.
return (
   <div className="cargo">
     <div className="case">
       <form className="form" onSubmit={numberSet}>
         <label>
           Set your uint:
           <input
             className="input"
             type="text"
             name="name"
             onChange={(t) => setUint(t.target.value)}
           />
         </label>
         <button className="button" type="submit" value="Confirm">
           Confirm
         </button>
       </form>
       <br />
       <button className="button" onClick={numberGet} type="button">
         Retrieve
       </button>
       <div className="result">{getNumber}</div>
     </div>
   </div>
 );
}
}
export default App;
Section 4: CSS
Time to add a minimal amount of styling to our project, this is totally optional but makes the project look less default. Feel free to make any adjustments!
.cargo {
 text-align: center;
 display: flex;
 justify-content: center;
 background-color: #f2f1f5;
 height: 100vh;
}
.pack {
 min-height: 50vh;
 width: 50vw;
 display: flex;
 flex-direction: column;
 align-items: center;
 justify-content: center;
}
.form {
 height: 20vh;
 width: 20vw;
 display: flex;
 justify-content: space-evenly;
 flex-direction: column;
}
.button {
 width: 20vw;
 height: 5vh;
}
.result {
 padding-top: 20px;
}
Now we should start our project and have the ability to interact with it using Web3 and Infura!
~$ yarn start
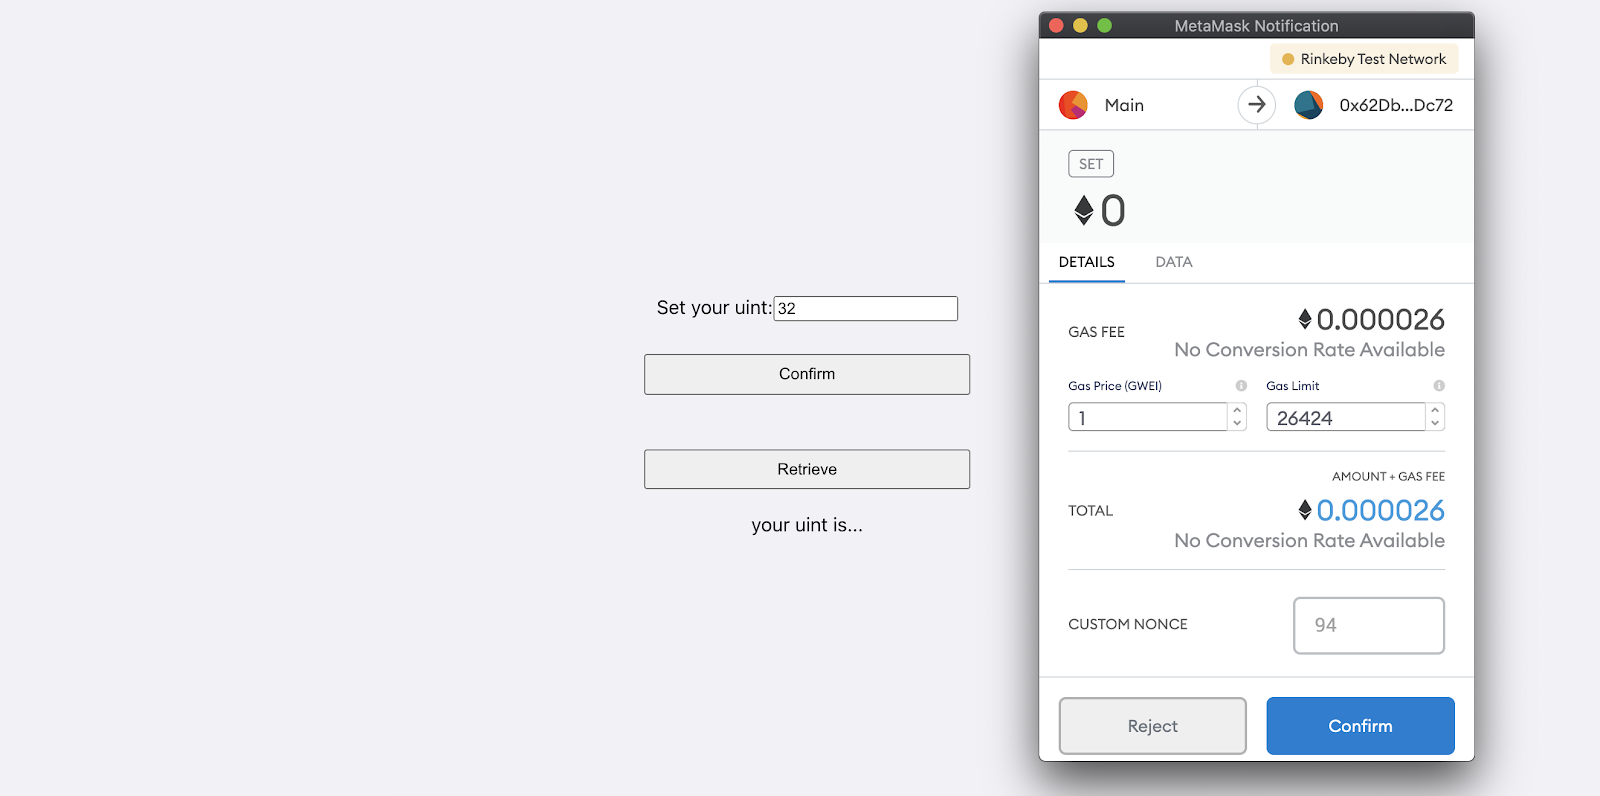
Section 5: Web3 working code
import React, { useState } from "react";
import "./App.css";
import { SimpleStorage } from "./abi/abi";
import Web3 from "web3";

const web3 = new Web3(Web3.givenProvider);
const contractAddress = "your contract address";
const storageContract = new web3.eth.Contract(SimpleStorage, contractAddress);

function App() {
 const [number, setUint] = useState(0);
 const [getNumber, setGet] = useState("your uint is...");

 const numberSet = async (t) => {
   t.preventDefault();
   const accounts = await window.ethereum.enable();
   const account = accounts[0];
   const gas = await storageContract.methods.set(number).estimateGas();
   const post = await storageContract.methods.set(number).send({
     from: account,
     gas,
   });
 };

 const numberGet = async (t) => {
   t.preventDefault();
   const post = await storageContract.methods.get().call();
   setGet(post);
 };
 return (
   <div className="cargo">
     <div className="case">
       <form className="form" onSubmit={numberSet}>
         <label>
           Set your uint:
           <input
             className="input"
             type="text"
             name="name"
             onChange={(t) => setUint(t.target.value)}
           />
         </label>
         <button className="button" type="submit" value="Confirm">
           Confirm
         </button>
       </form>
       <br />
       <button className="button" onClick={numberGet} type="button">
         Retrieve
       </button>
       <div className="result">{getNumber}</div>
     </div>
   </div>
 );
}

export default App;
Section 6: Ethers
Now that we have built out a simple dApp utilizing truffle, Infura, and Web3 let’s go ahead and take the same project and use Ethers.js instead!
Some points why you would consider Ethers:
➡️ Connect to Ethereum nodes over JSON-RPC, INFURA, MetaMask, and others.
➡️ Tiny (~88kb compressed; 284kb uncompressed)
➡️ Extensive documentation
➡️ Large collection of test cases which are maintained and added to
➡️ Fully TypeScript ready, with definition files and full TypeScript source
➡️ It is very easy to connect to a node (such as Infura)
➡️ Ethers has a method that allows you to create a provider, which will auto-connect with a default connection to that provider (using Infura)
➡️ MIT License (including ALL dependencies); completely open source to do with as you please
To use Ethers let’s in our terminal go ahead and run
~$ npm install --save ethersLet’s make sure we import the ethers library after our install
import React, { useState } from "react";
import { simpleStorage } from "./abi/abi";
import { ethers } from 'ethers';
import "./App.css";
Next we will make sure we are able to call on our contract
const storageContract = new ethers.Contract(contractAddress, abi, signer);We are going to be passing in a signer opposed to a provider since we need to send a tx (anything not read-only), which means we need to use a signer.
*Note: If you are not going to connect using the default provider, you could for instance connect to Infura (details found here).
Examples below:
let provider = new ethers.providers.Web3Provider(web3.currentProvider);let infuraProvider = new ethers.providers.InfuraProvider('rinkeby');Next we will add our signer, contractAddress and storageContract.
*Note 1: If you go back to Section 2 you’ll notice a few differences in our ethers declarations.
*Note 2: There is also a section below under quick comparisons that helps showcase interaction differences between web3 and ethers.
import React, { useState } from "react";
import "./App.css";
import { SimpleStorage } from "./abi/abi";

import { ethers } from "ethers";

let abi = SimpleStorage;
const provider = new ethers.providers.Web3Provider(window.ethereum);

const signer = provider.getSigner();

const contractAddress = "0x62Db0a2161e304819f4d54d54B90A3Feae6dDc72";

const storageContract = new ethers.Contract(contractAddress, abi, signer);
Since signer is new for us we can view it as an abstraction of an Ethereum Account, which can be used to sign messages and transactions and send signed transactions to the Ethereum Network to execute state changing operations.
Section 7: Logic
We are still using hooks so the main differences we will see arrive within numberSet and numberGet. We are still grabbing the account that is connect to the dApp and now making adjustments to gas and post.
Web3 allows for declarations with methods such as:
const gas = await storageContract.methods.set(number).estimateGas();However ethers looks something like this (details on v4 / v5 ethers changes)
const gas = await storageContract.estimateGas.set(number);function App() {
const [number, setUint] = useState(0);
const [getNumber, setGet] = useState("your uint is...");
const numberSet = async (t) => {
t.preventDefault();
const accounts = await window.ethereum.enable();
const account = accounts[0];
const gas = await storageContract.estimateGas.set(number);
const post = await storageContract.set(number);
};
const numberGet = async (t) => {
t.preventDefault();
const post = await storageContract.get();
setGet(parseInt(post));
};The biggest adjustment here is the fact that ethers will return a big number, so we can not rely on setGet(post) as we did within Web3. There are a few ways to make adjustments (pending on if you wanted post to stay a BigNumber) but in this example we are going to use parseInt.
const numberGet = async (t) => {
t.preventDefault();
const post = await storageContract.get();
setGet(parseInt(post));
};Section 8: Ethers working code
Our return will continue to be the same within both projects. Again, is a high level example of some of the differences between Web3 and Ethers. We encourage you to build this out further and share your project with us!
Full App.js code:
import React, { useState } from "react";
import "./App.css";
import { SimpleStorage } from "./abi/abi";
import { ethers } from "ethers";
let abi = SimpleStorage;
const provider = new ethers.providers.Web3Provider(window.ethereum);
const signer = provider.getSigner();
const contractAddress = "your contract address";
const storageContract = new ethers.Contract(contractAddress, abi, signer);
function App() {
 const [number, setUint] = useState(0);
 const [getNumber, setGet] = useState("your uint is...");


 const numberSet = async (t) => {
   t.preventDefault();

   const accounts = await window.ethereum.enable();
   const account = accounts[0];
   const gas = await storageContract.estimateGas.set(number);
   const post = await storageContract.set(number);
 };

 const numberGet = async (t) => {
   t.preventDefault();
   const post = await storageContract.get();
   setGet(parseInt(post));
 };
return (
<div className="cargo">
<div className="case">
<form className="form" onSubmit={numberSet}>
<label>
Set your uint:
<input
className="input"
type="text"
name="name"
onChange={(t) => setUint(t.target.value)}
/>
</label>
<button className="button" type="submit" value="Confirm">
Confirm
</button>
</form>
<br />
<button className="button" onClick={numberGet} type="button">
Retrieve
</button>
<div className="result">{getNumber}</div>
</div>
</div>
);
}
export default App;Quick Comparisons
Connecting to Ethereum
// web3
var Web3 = require('web3');
var web3 = new Web3('http://localhost:8545');

// ethers
var ethers = require('ethers');
const url = "http://127.0.0.1:8545";
const provider = new ethers.providers.JsonRpcProvider(url);
Connecting: Metamask
// web3
const web3 = new Web3(Web3.givenProvider);

// ethers
const provider = new ethers.providers.Web3Provider(window.ethereum);
Creating Signer
In Ethers, a signer is an abstraction of an Ethereum Account. It can be used to sign messages and transactions and send signed transactions to the Ethereum Network.
In Web3, an account can be used to sign messages and transactions.
// web3
const account = web3.eth.accounts.create();

// ethers (create random new account)
const signer = ethers.Wallet.createRandom();

// ethers (connect to JSON-RPC accounts)
const signer = provider.getSigner();

Signing a message
// web3 (using a private key)
signature = web3.eth.accounts.sign('Some data', privateKey)

// web3 (using a JSON-RPC account)
// @TODO

// ethers
signature = await signer.signMessage('Some data')
Deploying a Contract
// web3
const contract = new web3.eth.Contract(abi);
contract.deploy({
   data: bytecode,
   arguments: ["my string"]
})
.send({
   from: "0x12598d2Fd88B420ED571beFDA8dD112624B5E730",
   gas: 150000,
   gasPrice: "30000000000000"
}), function(error, transactionHash){ ... })
.then(function(newContract){
    console.log('new contract', newContract.options.address)
});

// ethers
const signer = provider.getSigner();
const factory = new ethers.ContractFactory(abi, bytecode, signer);
const contract = await factory.deploy("hello world");
console.log('contract address', contract.address);

// wait for contract creation transaction to be mined
await contract.deployTransaction.wait();
Interacting with a Contract
// web3
const contract = new web3.eth.Contract(abi, contractAddress);
// read only query
contract.methods.getValue().call();
// state changing operation
contract.methods.changeValue(42).send({from: ....})
.on('receipt', function(){
    ...
});

// ethers
// pass a provider when initiating a contract for read only queries
const contract = new ethers.Contract(contractAddress, abi, provider);
const value = await contract.getValue();


// pass a signer to create a contract instance for state changing operations
const contract = new ethers.Contract(contractAddress, abi, signer);
const tx = await contract.changeValue(33);

// wait for the transaction to be mined
const receipt = await tx.wait();
Overloaded Functions
You can have multiple definitions for the same function name in the same scope. The definitions of the function must differ from each other by the types and/or the number of arguments in the argument list.This is an overload (or overloaded) function, which is a function that has the same name but different parameter types.
In Ethers, the syntax to call an overloaded contract function is different from a non-overloaded function. See below.
// web3
message = await contract.methods.getMessage('nice').call();


// ethers
const abi = [
  "function getMessage(string) public view returns (string)",
  "function getMessage() public view returns (string)"
]
const contract = new ethers.Contract(address, abi, signer);

// for ambiguous functions (two functions with the same
// name), the signature must also be specified
message = await contract['getMessage(string)']('nice');
BigNumber
A BigNumber is an object which safely allows mathematical operations on numbers of any magnitude.
Convert to BigNumber:
// web3
web3.utils.toBN('123456');

// ethers (from a number; must be within safe range)
ethers.BigNumber.from(123456)

// ethers (from base-10 string)
ethers.BigNumber.from("123456")

// ethers (from hex string)
ethers.BigNumber.from("0x1e240")
Hash
Computing Keccak256 hash of a UTF-8 string in Web3 and Ethers:
// web3
web3.utils.sha3('hello world');
web3.utils.keccak256('hello world');

// ethers (hash of a string)
ethers.utils.id('hello world')

// ethers (hash of binary data)
ethers.utils.keccak256('0x4242')
You made it! Our goal was to show how to use web3.js and ethers.js to read and write data to a testnet using Infura. We covered a lot:
- We used Truffle and Ganache to start our project
- We successfully compiled and migrated our smart contract
- We used Infura to connect to a testnet (Rinkeby)
- We connected our backend logic to React
- We explored the differences between using web3.js and ethers.js
We hope you have a better understanding of the differences between web3.js and ethers.js. As always, we encourage you to continue exploring all your options as you build awesome decentralized applications!

Infura offers developers fast, reliable access to Ethereum and IPFS networks. Our Core service is free and provides everything developers need to build decentralized applications.
Twitter | Newsletter | Community | Docs | Contact
Huge thanks to Robert Kruszynski for his contributions to this guide. For more Web3 tutorials, check out the Infura Blog and ConsenSys Academy.
